| Fitting In: Your Bicycle | |
| by T.J. Newton |
|
| Table of Contents | This is a rough draft that contains errors |
| 1 - Introduction | ||
| With the "green
economy" getting under way, clean and efficient forms of transportation
are becoming increasingly important to most people. While hybrid and other
green technologies have taken the lead in this area, there is one form of
green transportation that has been around for over a hundred years and hardly
gets noticed these days - the bicycle. Bicycles require zero fuel and produce
zero emissions. They're also great exercise! There are probably a lot of people reading this who own a bicycle, but don't ride it that often. One reason for this lack of interest may be that the bicycle doesn't "fit right." Getting your bicycle to fit you can be extremely difficult, even if you were fitted using the best equipment available. So here are some tips to help you get your bike fitting right whether you are fixing up an old bike or buying a new one. Of course, you're going to have to experiment, and that can be expensive. Internet and other retailers specializing in the sale or trade of used merchandise can be a big help here. Amazon, eBay, Craigslist, and a number of bicycle shops, co-ops, bike swaps, and other retailers come to mind. You can buy used parts, try them out, and resell them if they don't fit. New parts are good, too, but always check the return policy. You don't want to end up with a collection of bicycle parts you can't return or resell. Your local bike shop can also be a big help, particularly if they're willing to let you experiment. Bike shops can help you adjust some of the more difficult parts of your bicycle. Sometimes special tools are required, and online tutorials don't explain everything. If you get fitted for a new bicycle at your local bike shop, be sure to tell them you still plan on experimenting with the fit and see what they can offer you. Okay... there are three main "areas" involved in getting your bicycle to fit you: - The Seat Post and Seat - The Stem and Handlebars - The Pedals and Crank Arms |
||
2 - Toolbox |
||
| This toolbox
lists tools by their general description. If you see something listed and
you don't know what it is, don't worry - it will be described in plenty
of detail as you read on. You may or may not need all of the tools listed
in the toolbox, but you'll probably need a few things you don't see listed
(rags would probably be a good idea, and a bike stand would be really nice). General-Use Tools, Seat Post and Seat Tools, Stem and Handlebar Tools, Pedal Tools - Screwdriver (Phillips and flathead) - One or two small adjustable wrenches - Metric hex wrench set Crank Arm and Bottom Bracket Tools - Screwdriver (Phillips and flathead) - Metric hex wrench set - Metric ratchet and socket set - Crank Puller - Bike lube - Chain oil - Pliers Adjustable cup bottom brackets (generally) --- Lockring tool --- Pin spanner Cartridge type bottom brackets (generally) --- Bottom bracket tool Shift and Brake Cable Tools - Screwdriver (Phillips and flathead) - A small adjustable wrench - Metric hex wrench set - Pliers - Heavy duty wire cutters - Chain oil |
||
3 - The Seat Post and Seat |
||
3.1 - Seat Post Adjustment and Replacement For most styles of bicycles, your leg should be almost straight when the pedal is closest to the ground, but your knee should still be slightly bent (there are exceptions - like BMX bikes). To accomplish this, you can move the seat up or down using the seat post. Adjusting the seat post typically only requires an adjustable wrench, hex wrench, or screwdriver. The adjustment screw or bolt is usually located at the bottom of the seat post, where the seat post is inserted into the bike frame. Once the seat post is at the height you want, re-tighten the adjustment bolt (do not over-tighten it or you may damage your frame). Even after you find the height you want, you'll probably need to "tweak" the seat post height in very small increments as you experiment with other parts of your bike. If you can't raise or lower your seat post after loosening the bolt, the seat post may be stuck. Try turning the seat post back and forth while pulling up on it (you can grip the seat to do this, assuming it is still attached). If it is stuck really bad, you can use a spray lubricant (like WD-40) to try and loosen it. If that doesn't work, you can use a pipe wrench to pull the seat post out (the pipe wrench will probably leave a small gouge in the seat post which can be smoothed with a piece of sandpaper and wiped clean). Be sure to put some bike lube (like Park PPL-1) down inside the bike frame before you re-insert the seat post. In fact, just put lube all over the seat post, too, and wipe off any excess with a rag. Most seat posts are marked with a "max height" line near the bottom of the post. If you can see the line, your seat post is adjusted too high. If your seat post isn't tall enough for you, you can buy an extra-tall replacement seat post. Be sure to measure the diameter so it will fit on your bike. Apply some bike lube down inside the bike frame, and smear some onto the new seat post before you insert it (except on carbon frames, which don't require lube here). Wipe off any excess lube with a rag after the seat post is inserted. 3.2 - Seat (saddle) Adjustment and Replacement The seat itself is usually called the "saddle," even though it attaches to the "seat post." You're probably going to want to try out some different saddles. They come in a number of widths, but the most common widths are 130mm, 143mm, and 155mm (or there about). If you can, try all three sizes and experiment with width before choosing other features (used saddles are a great way to save money). You can also get your "sit bones" measured at a bike shop. Saddles are designed for different purposes, so pick one that fits your riding needs as well as the clothes you wear when riding (you'll probably want to try some bike shorts). Be sure to try at least one saddle with minimal to moderate padding that has a groove in the middle. |
||
|
||
For most people, the saddle experiment never really ends, so don't be afraid to try a new one from time to time. Removing and attaching a new saddle is pretty easy, but there a number of different brackets currently used. Some require only a hex wrench or screwdriver, while others require two adjustable wrenches. If you have the kind of bracket that "comes apart" as you loosen it, don't forget how to put it back together! Which way does it go on the post? If you have to, write it down or take a picture. Most brackets also allow the saddle to slide backward and forward, and to be tilted up or down. I've read a lot of different advice about these adjustments. As far as sliding the saddle back and forth, you want to be sitting comfortably on the seat when you pedal. If your saddle is too far back, you'll start sitting on the front part (that'll start to chafe), and if your saddle is too far forward your butt will hang off the back (that'll chafe, too). For the saddle tilt on most types of bikes, the saddle should be level or tilted slightly forward, depending on the saddle. If you feel like you want to tilt the saddle back or raise the handlebars, you may need to adjust or replace the stem. BMX bikes, of course, tend to have high handlebars with the seat tilted back. But if the handlebars are too close to the saddle, the stem may still need to be adjusted or replaced. |
||
4 - The Stem and Handlebars |
||
4.1 - Stem and Handlebar Adjustments The stem is the part of the bike that holds the handlebars and connects them to the fork, allowing the front wheel to turn. |
||
|
||
The most common adjustments to the stem are moving the handlebars up and down, and twisting the handlebars. Both of these adjustments also affect the how close or far away the handlebars are from the saddle, so you may be able to experiment with these adjustments and get the fit you want. One important idea to keep in mind is that as you raise the stem higher, the handlebars move closer to the bike, and vice versa. This is because of the bike's design. There are two main types of stems - "threadless" and "quill." |
||
|
||
To adjust a threadless stem up or down, remove the bolt on top of the "headset" which holds the "top cap" in place, and remove the top cap. Then, loosen the screw(s) or bolt(s) on the stem that are closest to the saddle, and pull the stem off. You can grip the handlebars to do this. Because of the tight fit of most stems, you will probably have to turn the handlebars back and forth as you're pulling up or pushing down; turn the handlebars back and forth the same way you would if you were turning the front wheel, but put your foot next to the front wheel so it doesn't turn, too. The bolts will require either a hex wrench, adjustable wrench, or a screwdriver. Below and above the stem you notice large metal rings, similar to washers. Stacking all of the rings below the stem raises it to the maximum level, and stacking all of the rings above the stem lowers it to the minimum level. If you replace your stem, you may need to purchase differently sized rings so that the top cap will fit tightly. These are available from a bike shop or online, but you need to measure carefully. The rings have to fit exactly right... |
||
|
||
To adjust a quill stem up or down, loosen the bolt on the top of the stem with a hex wrench, adjustable wrench, or a screwdriver, and pull the stem up or push it down. You can grip the handlebars to do this. Because of the tight fit of most stems, you will probably have to turn the handlebars back and forth as you're pulling up or pushing down; turn the handlebars back and forth the same way you would if you were turning the front wheel, but put your foot next to the front wheel so it doesn't turn, too. To twist the handlebars (threadless or quill), loosen the screw(s) or bolt(s) closest to the handlebars themselves. Look around, because they may be under the handlebars, over the handlebars, in front of the handlebars, or behind the handlebars. Then "rotate" the handlebars to twist them. |
||
|
||
Try raising, lowering, and twisting the handlebars into various positions. Adjust them so that your shoulders and torso are "stretched out" while still feeling comfortable on the saddle. 4.2 - Stem Measurement and Replacement If you still feel like you need the handlebars higher, you can try a "taller" stem or "stem riser" (be sure to buy the right diameter for your quill or threadless system; this is generally listed as the diameter of your current quill stem or steerer). Keep in mind that as you move the handlebars up, the bike's design causes them to move a little closer to the saddle. And you may just need to move the handlebars further away from the saddle, not up or down. Generally, the longer your arms and torso, the more distance you need between the saddle and handlebars. If you need more distance between the saddle and handlebars, you will either need to replace the stem or buy a bike with a longer "top tube." The top tube runs between the handlebars and the saddle. (It actually runs between the "head tube" and "seat tube," but if you remember "top tube" most bicycle shops will know what you mean.) Every bicycle has a different "geometry" that varies by size, model, and manufacturer. While you can adjust the handlebars in a number of different ways, getting the distance between the saddle and handlebars just right is more challenging. If you buy a new bike, and you're lucky, your bike will have a "top tube" that is the right length for you. But even then, you will need to fine tune. Sliding the saddle backward or forward won't work because it messes up the angle between the saddle and the pedals. So you need a way to move the handlebars further away or closer in. This involves adjusting, and sometimes replacing, the stem. Removing the stem uses the same bolts used to adjust the height of the handlebars described above. For quill stems, this is typically the top bolt. For threadless stems, you loosen the bolts on the stem that are closest to the saddle, then loosen the top bolt and remove the top of the "steerer." Then you can separate the stem from the steerer. The top bolt of the steerer also adjusts the "tension" on a threadless headset. If you over-tighten it, it will be hard to steer; if you leave it too loose, the fork will jiggle (which can be dangerous). |
||
|
||
Before you buy a stem, you need to know the "clamp diameter" of your handlebars (see diagram below). Most are 25.4mm, 26mm, or 31.8mm. If you buy a stem with a 26mm handlebar clamp, you can get shims to make it work with a 25.4mm bar. You can also just make shims by cutting apart a beer can. To measure the clamp, you can remove the handlebars from the stem (this is different from removing the stem itself), but this sometimes requires you to remove the brake levers and grips depending on your stem. To remove the handlebars, loosen the same bolts used to twist the handlebars above. Most bike shops have calipers that will do the job without removing anything. If you need to move the handlebars further away from the saddle, most new quill stems will only give you a few centimeters at the most. Be sure to buy the right diameter quill stem if you want to go that route (this is the diameter that fits down into the fork.) If you have a quill stem and need go out further than a few centimeters, you can just get a "threadless stem adapter" to fit the same diameter as your quill stem. |
||
|
||
Threadless stems allow you to move the handlebars out 4 inches or more, depending on the kind of threadless stem you buy. I've only seen adapters that fit bikes with 22.2mm and 25.4mm diameter quill stems (1), yet there are a few bikes with other sizes (more info). If you already have a threadless stem, you're in luck! All you have to do is replace it with a longer one. The most common diameters (2) for threadless stems are 1 inch (25.4mm) and 1-1/8 inch (28.6mm). If you're replacing a threadless stem that is too short, just measure the diameter of the "steerer tube clamp" - it is the clamp closest to your saddle (the "threadless stem diameter," pictured below); the same clamp that moves the handlebars up and down. If you're going to use a threadless adapter for a quill system, make sure it matches the diameter of the threadless stem that you buy, as well as the diameter of your existing quill stem (3). With all the different ways threadless stems are described out there, getting the right size can be like solving a puzzle! You might see a threadless stem described as "1 inch threadless, 120mm, 26mm clamp." That means the stem fits a 1 inch (25.4mm) steerer tube (or threadless adapter), and is 120mm long with a 26mm handlebar clamp. |
||
|
||
Threadless stems come in a number of different lengths. The lengths I've seen that are considered "long" currently seem to range from 110mm to 140mm. The "longest" threadless stem I've seen is shown below. It is 140mm in length and will move the handlebars out up to 4 inches farther than your existing stem, depending on how you position the "hinge." Some threadless stems also have a "hinge" (it's called an "adjustable stem") to give you more positioning options. |
||
|
||
If you are replacing a quill stem with a threadless stem, keep in mind that a few quill stems have the shift levers mounted on the stem using a clamp. The clamp wraps around the stem and fastens with a bolt. If you want to replace the quill stem with a threadless stem and have your shift levers mounted on the stem, you're going to have trouble attaching your existing shift levers to the threadless stem. The clamp holding the shifters to the quill stem won't usually fit onto a threadless stem. An easy way around this problem (that doesn't require a lot of work) is to bend the shifter clamp around the threadless stem (don't remove the shift levers from the clamp itself). The bolt isn't going to go into the bent clamp, so just use a "zip tie." It should work just fine. If you want to get new shift levers instead, consult a bike shop first. There is more information in Appendix 1: Shift and Brake Cable Adjustments and Appendix 3: Fixie and Single Speed Conversion. If your shifters aren't mounted on your quill stem, you're already good to go. Most handlebars have brake levers, gear levers, and grips attached. In some cases, there might not be enough "slack" in the cable housing, or the cables may be to short, making it difficult or impossible extend the handlebars with a replacement stem. You may need to run all new cables if that happens, but there are other solutions, including heading to a bike shop. Before you do anything with your cables, think about whether or not you will be replacing the handlebars at some point. There is more information in Appendix 1: Shift and Brake Cable Adjustments and Appendix 3: Fixie and Single Speed Conversion. 4.3 - Handlebar Measurement and Replacement You may want to replace your handlebars with a wider or narrower set, depending on the distance between your shoulders. This is something you will have to experiment with. One tip for typical racing style handlebars ("drop bars") sold with road bikes is to measure across your back between the bony nubs that stick up on the top of your shoulders. You can measure your existing drop bars as shown below. Road bar widths are in centimeters and are usually more comfortable if they match your shoulder measurement. Note the distance of the "drop" (the lower part of the bar) can also vary, and is measured in centimeters. However, there are other types of bars (besides "drop bars") used on road bikes. And mountain bikes and BMX bikes use much wider handlebars that you will need to experiment with. There are also "bar ends," "aero bars," and other accessory bars that you can attach to your handlebars. |
||
|
||
Whatever you end up with, keep in mind that you generally want your shoulders and torso "stretched out" while still feeling comfortable on the saddle. And be sure to buy handlebars with a clamp diameter (shown in diagram above) that fits your stem. Most are 25.4mm, 26mm, or 31.8mm, and measuring your stem's bar clamp is described above. |
||
5 - The Pedals and Crank Arms |
||
5.1 - Pedal Type and Fit Most bikes can be fitted with pedals that use "bicycle shoes," which allow the rider to "bolt on" to the pedals much like a ski (they're called "clipless pedals"). This is generally considered the best pedal system to have for many types of riding, but you have to buy both the pedals and the shoes. And it is hard to experiment because the shoes are expensive and difficult to return after you ride in them. If you are considering a "bolt on" pedal system, a good first choice may be "mountain bike" pedals and shoes, even if you don't have a mountain bike. One reason for choosing "mountain bike" pedals and shoes is that it seems easier to walk around in mountain bike shoes, although there are other factors involved. |
||
|
||
You may also want to consider getting some inexpensive plastic "toe clips" for your existing pedals. If your existing pedals aren't compatible with toe clips, or if you want to experiment with various types of toe-clip-compatible pedals, it is probably a good idea to tryout several different types of toe-clip-compatible pedals. Toe clips typically accommodate whatever shoe you are wearing, although some shoes may fit the pedal better than others. |
||
|
||
Whether you "bolt on" or use toe clips, both types of pedals allow you to pull your foot up as you ride. That's a key advantage over pedals that you can only push down on. You will probably want to experiment with your foot position on the pedal, too. Foot position is related to the saddle and handlebar position, as well as crank arm length and "width" (q-factor). With most pedal systems, it is easy to reposition your foot in terms of the overall fit of your bike, but there are factors related to the pedal system that affect such adjustments. If you are using "bolt on" clipless pedals, the foot position (on the pedal) usually varies according to the pedals and shoes that you buy. An easy way to understand foot position on a "bolt on" pedal system is try to match your favorite foot position on pedals that do not "bolt on," and go from there. Otherwise, you are limited to the fit of the pedals and shoes that you buy, and any adjustments that may be available with that system. If you are using toe clips, it is easier to reposition your foot. And some toe-clip-compatible pedals offer more than than one place to attach the strap. Toe clips also come in different sizes and shapes. While toe clips do not always offer the "solid feel" of bolt on pedal systems, it easier to reposition your foot while riding. This can help you experiment with foot position if you are considering "bolt on" pedals and shoes. Regardless of which pedals you choose, most pedals can be removed or installed with an adjustable wrench. The left pedal usually unscrews backwards (turn clockwise to loosen). The pedals are also usually marked right (R) and left (L) somewhere on the pedal. Pedals also have a "stance width" related to how far the pedals stick out from the crank arms. Stance width, of course, is related to "q-factor," which I describe as the "width" of the crankset. Another way to think of stance width is to describe it as "the distance between the pedals" or "the distance between the pedals and the bike frame." With a conventional pedal that doesn't require you to "bolt on," you can usually put your foot up against the crank arm to experiment with slightly narrower widths, which means new pedals can only help a little if you want to narrow your stance. If you want to go wider, there are pedals that extend the "stance width," and they are easier and less expensive to install than a new "crankset" or "bottom bracket" (explained below). However, experimenting with crank arms may also affect the width between the pedals. 5.2 - Getting Started: Replacing the Crank Arms The pedals attach to the crank arms. The right and left crank arms together are called a crankset. Crank arms come in different lengths. They also have a "clearance" or "q-factor" (more info: 1 | 2), which I call the "width," that I haven't seen described helpfully anywhere but here. |
||
|
||
It seems like crank arms come in all lengths, but the most popular seems to be a length of 170mm. I've also seen 155, 160, 162.5, 165, 167.5, 172.5, 175, 177.5, 180, 185, and 190mm lengths. Generally, longer legs require longer crank arms. Experimenting with the crank arm length is one of the smartest things you can do. Not only does it feel more comfortable, it increases the effectiveness of your bicycle ride. Most cranksets I've seen come with "chainrings," which are the "gears" attached to the right crankarm (see picture above). If you don't buy your crankset with the "chainrings" (or gears) already attached, you will have to make sure your existing chainrings have the same number of bolts, as well as the same "bolt circle diameter" (BCD). The BCD is hard to measure, but the two most common sizes are 110mm and 130mm, so a precise measurement probably isn't necessary (there are some that are 135mm out there, though, along with other sizes). There are also single, double, and triple chainrings, but you probably want to keep that the same. Chainrings are usually sold according to the BCD and the number of teeth. So if you see a chainring listed as "48, 110 BCD," that means the chainring has 48 teeth and a 110 BCD. If you see "52/30T, 130 BCD," that means the larger chainring has 52 teeth, and the smaller one has 30 teeth, etc. (the "T" stands for "tooth"). Information describing cranksets sold with "pre-attached" chainrings usually describes the chainrings in this way. You also need to pay attention to the "width" (q-factor) of your cranks. This is how far the crank arms "stick out" or "flare out" from the side of the bike. Q-factor can more generally be thought of as the "stance width" or "distance between the pedals." But many people define q-factor as a specific measurement between the outside edges of the crank arms at the pedal holes, so describing it as "stance width" can cause mis-measurement. You can say that in most cases, q-factor impacts stance width more than anything else (the pedals would make up the rest of the stance width). |
||
|
||
Another important "factor" to keep in mind when experimenting with "q-factor" is the width of your saddle, though there are other "factors" you will probably want to consider, such as the length of your crank arms and your walking stance. Some people say that longer crank arms work better with a narrower q-factor. First, try experimenting with the "length" of your crank arms, and try to keep the same "width" (q-factor) you have. Although experimenting with both length and width can be rewarding, this "width" factor is rarely described when you purchase crank arms, whether they are new or used. You almost have to "eyeball it." If your crank arms look like they curve out from the side of the bike, replace them with ones that look like they curve out. If they look mostly straight and don't curve away from the side of the bike, replace them with ones that don't have much of a curve or bend. If you find the length you want, hopefully you won't have to worry about the "width." I'll go into more detail about "width" (q-factor) later. The information that follows is difficult. It requires at least two special tools. It's probably easiest to ask your bike shop to show you what's involved, or just get them to do it, but you can try it using the information below along with the tutorials I linked to. Used cranksets are pretty popular online. But you need to find out what kind of "bottom bracket" your bike has. The "bottom bracket" can be thought of as the "axle" the pedals and cranks spin around on. If you don't know what type of bottom bracket you have, you could end up with crank arms that won't fit onto your bike. So, you're going to need to examine your existing cranks. Before you can examine your cranks, you'll probably need to remove the "dust cover." Many cranks have a "little cover" (it's called a "dust cover") at the end of the crank arm opposite from the pedal. It is shaped like a circle, and looks like it could be the "axle" the cranks spin around on. If you already see a "bolt" there, your dust cover has probably been removed or fallen off (it happens!). You can remove the dust cover with an ice pick or nail if your dust cover requires a spanner head tool, but you may need a screwdriver, hex wrench, or other tool to remove the dust cover (the whole cover usually rotates like a jar lid). Once you remove the dust cover, you should see a "bolt" underneath. Some cranks may not have a cover, so it is easy to see the bolt. In other cases, the cover is easy to confuse with the bolt. Once the dust covers are off, there should be bolts on both sides of the bike. In other words, the right and left crank arm should each have a bolt. |
||
|
||
|
||
| There are a few newer cranks that use a totally different design, and most of them have bolts on only one side of the bike (though in some cases it may just be a "pinch bolt"). The cycling industry has adopted a number of new standards for cranksets, including the "external bearing" and "press-fit" designs. If you have a bike with a crankarm bolt on only one side of the bike, see Appendix 4: External Bearing and Press Fit Bottom Brackets for more information. Many BMX bikes also feature a number of different crank designs, including a 3-piece press-fit system that has bolts on both sides of the bike, and a "one-piece" Ashtabula system with no bolts at all. See Appendix 4: External Bearing and Press Fit Bottom Brackets for more information on BMX cranks. 5.3 - Examining Your Equipment: Cranksets and Bottom Brackets The main idea here is that we're looking for bolts. At this point, assuming you don't have an external bearing or press-fit crankset, you should see the bolts that hold on the crank arms. You'll need to remove these bolts to see the shape of your bottom bracket. To do that, you'll probably need a ratchet with a socket that fits the bolts on your bottom bracket, but you may just need a hex wrench. The bolts are usually metric, and are measured in millimeters (mm) whether you use a socket or a hex wrench. On some bottom brackets, the "bolts" are actually "nuts," but they probably still require a ratchet. Before you remove any bolts, it is a good idea to remove the chain from the chainring on the right crank. The "gears" on the back wheel of the bike usually have a device called a rear derailleur that will let you loosen the chain without taking it apart. If you can't figure that part out, head to a bike shop. If your bike has only one "gear," you're going to have to figure out how to take the chain off the chainring, or head to a bike shop (you can try loosening the rear wheel and sliding it toward the front of the bike). You may even need a chain tool like the Park CT-5. You can try this tutorial on chain tools as a last resort. Now, go ahead and remove the bolts with a ratchet or hex wrench. If your cranks require a hex wrench, they may be "one key release" crankarms that separate as you unscrew the bolt (more info), but they may not be. See the photo below for more information. |
||
|
||
Once the bolts are off, take a look at the shape of your bottom bracket. The crank arms fit onto the spindle (or axle) of your bottom bracket. The shape of your bottom bracket is what you're after. |
||
|
||
The picture above shows four bottom brackets with the cranks removed, but unless your cranks are "one key release," you should still have your cranks attached at this point. The shape will usually be visible with the cranks still on, as long as the bolt is removed. The shape you'll see most often is called a "square taper." It looks like a square. Of course, the shape of the square has more than one standard; the two main standards are ISO and JIS (4), but they are interchangeable for the most part. Mixing them up changes the "width" (q-factor) of the cranks, but you can always replace the bottom bracket if you don't get the fit you want (more info: 1 | 2). Typically, you find an ISO taper on a bike with an Italian crankset, especially a Campagnolo crankset. Most other cranks use a JIS taper. If your bottom bracket is not a square taper, it will most likely be "ISIS" or "Octalink." ISIS bottom brackets have 10 "splines," while Octalink bottom brackets have 8 "splines" (see image above). You will probably need to remove the cranks (described in section 5.4) to tell the difference between Octalink V1 and V2. BMX bottom brackets can have even trickier shapes. A lot of the shapes used on BMX bottom brackets look similar to other bottom brackets, but they're not the same. For example, some older BMX bikes may have an altogether different kind of un-tapered square sometimes called "American," though the term "American" can be used to refer a number of different aspects of bottom bracket design. And some newer BMX bikes may have a shape that looks similar to an ISIS bottom bracket, but it may not be ISIS compatible (the crank arms might also be a little different in these cases - see Appendix 4: External Bearing and Press Fit Bottom Brackets for more information). 5.3.1 - Offsets, chain guides, and E-types: Now for the "offsets." Some bottom brackets are longer on one side than they are on the other. When one side is longer than the other, it's called an "offset." An offset can also refer to a special way of mounting the bottom bracket so that it is "off-center." Of course, most bottom brackets that you'll run into nowadays do not have an offset; they are "symmetrical." Sometimes an offset is hard to spot without removing the bottom bracket, or at least removing the crank arms. But even if you haven't pulled the cranks yet, it is good to know about offsets before you buy new cranks or think about replacing your bottom bracket. If you decide to replace the crankset, bottom bracket, or both, there are certain circumstances in which you can end up with one crank arm can sticking out farther from the bike than the other (usually by only a few millimeters). It isn't usually all that difficult to fix, but it is a good idea to try and figure out if you have any offsets as early as possible. The first type of offset is usually found on adjustable cup square-taper bottom brackets, typically used on older bikes. Nearly all of these bottom brackets were "offset." For this kind of offset, the right side of the bottom bracket spindle is longer than the left. It has the effect of moving the chain farther away from the bicycle (called an offset chainline). This kind of "offset" bottom bracket is designed to work with a specially designed "offset" crankset to create an "offset chainline." You can't really tell whether a square-taper crankset has this kind of offset without trying it, but you can replace (or adapt in some cases) the bottom bracket if one crank arm sticks out farther from the bike than the other. This is described in more detail later. The second type of offset is often found on some newer square-taper cranksets, but it occurs on pretty much any crankset (Octalink, etc.) designed to fit on a "short spindle." In other words, if the spindle length of the bottom bracket is below a certain length, it is usually offset and requires offset cranks. If you have an older square-taper crankset, a short-spindle offset is similar to that of cranks found on older bikes with square taper cranksets (which had long offset spindles), but a new square taper crankset designed for an offset "short spindle" will not always work on an older adjustable cup square-taper bottom bracket. If you use them on an older square-taper bottom bracket, they will have an extremely large q-factor, and the offset may not match (one crank arm might stick out farther than the other). These newer offset square-taper cranks are designed to fit on square-taper bottom brackets with a short spindle (such as the Shimano BB-UN54 MM107 bottom bracket or the Sugino BB105 or CBB103 bottom bracket). I've often seen these cranks sold for "fixies." If your bike already has a square-taper bottom bracket with a short spindle, you will only be able to use cranks designed for that spindle unless you replace the bottom bracket. If you try to put an older set of offset cranks on an offset bottom bracket with a short spindle, the crank arms will probably hit the bike frame. If you are unsure whether or not you have a bottom bracket with a short spindle, you should probably remove the bottom bracket. The third type of offset is sometimes found on a few newer bikes with "chain guides" or special "E-type front derailleurs." A "chain guide" is a device that is usually mounted to the bottom bracket to secure the chain, and it can be found on some mountain and BMX bikes used for certain types of riding (the term "chain guide" can mean other things to a cyclist, but this is the most common usage). An "E-type front derailleur," like other front derailleurs, is a device used to "shift the front gears," except an E-type front derailleur is mounted to the bottom bracket instead of to the bike frame like other front derailleurs. Since chain guides and E-type front derailleurs are attached to the bottom bracket, the bottom bracket has to make room for the device. In most cases, the bottom bracket makes room with an "offset" that is appropriate for a chain guide or an E-type front derailleur. Square taper, ISIS, Octalink, and pretty much any other bottom bracket shape or design can have this type of offset if it is mounted on a bike with a chain guide or an E-type front derailleur. For this kind of offset, the bottom bracket can have a special mounting "cup" that mounts the bottom bracket "off-center," but it can also be designed so that the left side of the bottom bracket is longer than the right. Either way, once the chain guide or E-type derailleur is installed, the bottom bracket will turn out the same length on both sides, allowing for "symmetrical" crank arms. Depending on the bottom bracket, spacers may also be required along with the chain guide or E-type front derailleur to achieve the correct offset or to align the device. If you are replacing your cranks and have a chain guide or E-type front derailleur, it usually cannot be adjusted to accommodate any increases in size to the outer chainring (the outer chainring is usually the largest). So you will have to buy cranks with the same size outer chainring (or slightly smaller), or use the chainrings from your existing cranks if they have the same BCD. Some people refer to the use of a "chain guide" or "E-type front derailleur" as an "offset chainline." That makes no sense. I suppose that theoretically, one could imagine starting with a symmetrical spindle and making the left side longer. That would lengthen the spindle and move the chainline farther from the bike. But since it would change the overall length of the spindle, it has no practical consequence when buying a given spindle length. And many E-type bottom brackets (as well as bottom brackets intended for chain guides) technically have a symmetrical spindle and are just mounted to the bike so that the spindle is "off-center." Although spacers can be used with chain guides or E-type front derailleurs, the "chainline" cannot be changed without making the right crank arm stick out too far from the bike frame. So, I think that in this context, an "offset chainline" should refer only to specially designed offset cranks that fit onto an offset adjustable cup bottom bracket. |
||
|
||
|
||
5.4 - Removing and Replacing the Crankset By now you should know what type of cranks will work with your bottom bracket, and you're probably ready to go ahead and remove the old cranks. To remove most cranks, you need a tool called a crank puller. The Park CCP-2 (or CCP-22) fits most square tapered cranksets. The Park CCP-4 (or CCP-44) fits Octalink and ISIS compatible cranksets. There are also some other rare sizes out there (more info). If your cranks required a hex wrench and already separated from the bike, they are most likely "one key release" and don't need a crank puller. Other hex designs will still need a crank puller (more info). If you need a crank puller, be sure to buy the one you need with your cranks. Buy a new crank puller because the packaging comes with directions. I'm going to assume that if your bike requires a crank puller, you've gone ahead and bought a brand-new one at this point. To remove the cranks, make sure that the dust cover (if present) has been removed from your crank arms, as discussed earlier. If your cranks require a ratchet and socket, unscrew the bolts with the ratchet (again, they may turn out to be nuts, not bolts, depending on your bottom bracket). Then, use your crank puller as described on the packaging. If your cranks require a hex wrench instead of a ratchet, unscrew the cranks with the hex wrench. If the crankarms separate as you unscrew the bolt, they are most likely "one key release" and will not require a crank puller (more info). Otherwise, use your crank puller as described on the packaging. Put your new cranks on and put it all back together. Don't ride it just yet! Try shifting the gears first. You can use a bike stand or lift up the bike frame. You have to turn the pedals with your hand to test out the gears. If the front gears don't seem to be "shifting right," or if the chain falls off, you may need to adjust your front derailleur or replace your bike chain. 5.5 - Finishing Up: Getting the Crankset Working If your chain is worn or is an improper match for your new crankset, you may need to replace the chain. If you have an older bike and a newer crankset, you may need a narrower chain. These are called "9 speed" or "10 speed" chains, though the names have nothing to do with having a "ten speed" bike. A "9-speed" chain will work with just about anything. You may also need to shorten or lengthen the chain using a chain tool (more info). The chain tool is difficult to get used to, so it might be a good idea to get some help at a bike shop. In most cases, the chain probably won't be the problem. |
||
|
||
You may also need to make some adjustments to the front derailleur to get your crankset working. The "height" of the front derailleur should position the "cage" (the part the chain runs through) just a few millimeters above the outermost front gear (the largest chainring) (more info). The height can be adjusted by loosening the clamp that attaches the derailleur to the bike frame. Obviously, you don't want the cage bumping the largest chainring, but if the height isn't that far off, don't adjust it. Otherwise, you may have to adjust the tension in the cable. (That information is two paragraphs down.) Chain guides and E-type front derailleurs do not usually have a height adjustment because they mount to the bottom bracket instead of the bike frame. If you have a chain guide or an E-type front derailleur and it is banging into the chainrings, you can replace the chainrings with ones that are the same size as your old ones as long as the BCD matches (first, try putting your old chainrings onto your new cranks). In the case of an E-type front derailleur, you could replace it with a front derailleur that clamps to the seat tube, but that isn't always possible because the bike frame usually has to have a round seat tube to accommodate a regular front derailleur. If you don't mind using only one front gear, you could just remove the derailleur altogether. But if you replace or remove an E-type derailleur, you will have to add a spacer to the right side of the bottom bracket in most cases (see Cartridge Type Bottom Brackets: Examination and Removal for information about removing most E-type bottom brackets). The same is true for chain guides; you'll need a spacer if you remove one. The spacer fills the spot where the chain guide or E-type derailleur was in order to keep the left crankarm from sticking out farther than the right. One or more "Shimano BB-M952 spacers" with the right "thickness" should work in most cases. If the spacer doesn't work (or you can't find a spacer that will, such as those in the "Profile Racing BB Spacer Kit"), you can replace the bottom bracket with a symmetrical one (or a bottom bracket appropriate for your crankset). Assuming your derailleur is where you want it, you may need to adjust the cable tension on the front derailleur for a number of reasons. To adjust the cable tension, first shift the front gear lever to the lowest front gear (the smallest chainring), then loosen the bolt that holds the cable to the front derailleur. You will probably need an adjustable wrench, hex wrench, or screwdriver. In most cases, you should see the cable sticking out somewhere. You should take a picture or write down the way the cable attaches to the bolt. This is in case the cable pops out from behind the bolt or in case you remove the bolt (just loosen it). Pull the cable tight with some pliers and re-tighten the bolt (you have to keep tension on the cable while you tighten the bolt). Most front derailleurs also have two very tiny screws marked (H) for high and (L) for low (more info). You may need to adjust these screws to get the derailleur to work properly with the chainrings on your new crankset. The screw marked "H" controls the outermost front gear (the largest chainring) and the screw marked "L" controls the innermost front gear (the smallest chainring). If you turn the screw marked "H" too far one way, the chain will fall off the bike when you move the handlebar shift lever into high gear. If you turn "H" too far the other way, you won't be able to access the largest gear; the chain won't quite make it onto the largest chainring no matter how hard you pull on the lever. The "H" screw has to be set just right. The screw marked "L" works the same way, except it is for the smallest chainring. If you can't get the derailleur quite where you want it by adjusting the screws, try adjusting the cable tension (described above) and then adjust H and L again. Most people get a bike shop to perform these adjustments to make sure the chain won't fall off! In a few cases, your derailleur may simply not work properly with all of the gears (chainrings) on your new crankset, even after you've tried adjusting the H and L screws and made every other adjustment you can make. But you should still be able to get at least one front gear working (the front gear of your choice) by adjusting "H" and "L" and playing with the front shift lever. You can also replace the front derailleur or see if you can adjust the "chainring spacers," but you'll probably want to leave that to a bike shop. There is also a lot of debate about "chainline," which describes the back-to-front angle of the chain. The chainline changes based on whatever front and rear gear you are in. For most people, problems are minor, if there are any problems at all. But if the chainline angle is too great in certain gears, it can cause noise, uneven wear, skipping, or occasionally throw the chain whenever you are in that gear. If you have any serious concerns about chainline, consult a bike shop. If your bike is a fixie or a single speed, see Appendix 3: Fixie and Single Speed Conversion for more information about chainline. It's also probably a good time to oil the chain. Use bicycle chain oil (like Park CL-1)! Now you can put your bike to the test. If you're lucky, you won't need to worry about the "width" (q-factor) of the cranks. If the width isn't right, you may need to replace the cranks or the bottom bracket. You may also need to replace the bottom bracket if one crank arm sticks out further than the other, though in some cases you may be able to adapt the bottom bracket. 5.6 - Getting Started: Replacing the Bottom Bracket If the width (q-factor) isn't right, first try more cranks and see if you can get the width you need. Try some cranks with less of a visible outward "curve" if you want to go narrower. Another type of pedal may also offer a solution, especially if you want to go wider, though you may be able to come in a tiny bit for more comfort. Otherwise, you are going to have to get a shorter or longer bottom bracket. You may also need to replace the bottom bracket if one crank arm sticks out further from the bike frame than the other, especially if you have a square taper crankset. This can happen if you have an "offset" bottom bracket with a "symmetrical" crankset, or a "symmetrical" bottom bracket with an "offset" crankset. It might also be possible to have an "offset" bottom bracket with the wrong offset for a particular crankset, even if that crankset is offset. (The "offset" here refers to specially designed "offset" cranks; it does not refer to problems related to "chain guides," E-type front derailleurs, or related spacers.) So, if the right crank arm sticks out farther from the bike frame than the left, you probably have a symmetrical crankset and an offset bottom bracket spindle. If the left crank arm sticks out farther from the bike than the right, you probably have an offset crankset and a symmetrical bottom bracket spindle, though you might have an offset crankset and an offset bottom bracket that has the wrong offset. (You may be able to adapt a symmetrical bottom bracket to accept any offset crankset - see Appendix 2: Adapting a Symmetrical Bottom Bracket to Accept Offset Cranks for more information.) If you have a chain guide or an E-type derailleur, your cranks should come out right as long as the device is installed (assuming it was installed properly). In most cases, if you remove the device and don't add a spacer, the left crank arm will stick out further than the right (more info). So, while you don't need to replace the bottom bracket if you remove a chain guide or E-type front derailleur since you can just use a spacer, you may want to switch to a symmetrical bottom bracket, or you may want try a bottom bracket with a different spindle length. |
||
No matter what your reason for replacing the bottom bracket (q-factor, taper, offset, or any reason), try heading to a bike shop and describing what you're trying to do. At the very least, find out what size tools you need to remove the bottom bracket (there are 10 or 20 different specialty tools for this, but you only need two, possibly three at the most). The links and information offered below explain everything in more detail. It's kind of hard to figure out. If you have a BMX, see Appendix 4: External Bearing and Press Fit Bottom Brackets for important information. If you decide to replace the bottom bracket, you will need to buy one that is the same shape. Assuming you have the crankset you want, you'll probably only want to change the length of the bottom bracket spindle. So, it is recommended that you stay with the same shape bottom bracket you currently have. Sometimes this is an easy swap; you buy the same type of bottom bracket with the same shape and just change the length. But that's not always the case. You may need to upgrade, or you may need to change the offset. Once you know the shape you need, there are a number of possibilities. Consider the possibilities in the chart below. If you don't know the difference between an "adjustable cup" and a "cartridge," don't worry; they are described in the next section. |
|
|||||||||||
| Some things to keep in mind... - Anytime you make changes to the bottom bracket or cranks, you run the risk of altering the chainline undesirably. In most cases, it works out fine, but you should consult a bike shop if you have any serious concerns about chainline. If your bike is a fixie or a single speed, see Appendix 3: Fixie and Single Speed Conversion for more information about chainline. - If you have a chain guide or an E-type front derailleur and symmetrical cranks (most bikes that come with chain guides or E-type derailleurs have symmetrical cranks), you have to stay with a bottom bracket that has the kind of offset required by chain guides and E-type front derailleurs. E-type derailleurs usually fit onto E-type bottom brackets, while chain guides have similar bottom brackets with the appropriate offset (chain guides can frequently be used with E-type bottom brackets, and vice-versa). In most cases, you can only use a symmetrical bottom bracket if you remove the chain guide or E-type derailleur. - If you are upgrading from an adjustable cup bottom bracket to a cartridge, you will probably need two sets of tools (one set to remove, one set to install), and experimentation with several bottom brackets will probably be necessary. It's all described below! - Finally, if you've already tried out some new cranks and ended up needing to replace the bottom bracket, you probably know what will fit on your bike. So you can experiment with more options, and not have to mess with parts that don't fit. Feel free to change the shape, type, or design of the bottom bracket and cranks to whatever you want (you can change from a square taper cartridge to an Octalink or ISIS cartridge, for example, or even try out an external bearing system). Just be sure to buy a bottom bracket system that fits your bike frame and a set of cranks that match the bottom bracket. Keep in mind that the width (q-factor) of the cranks will be different for every bottom bracket/crank combination you try. You can use the information below to make sure everything will fit. 5.7 - Adjustable Cup Bottom Brackets: Examination and Removal Your bike will most likely fall into one of two categories, depending on the age of the bike. For older bikes, your bottom bracket will look similar to the adjustable cup bottom bracket system in the picture below (5). The two main tools usually involved are a "pin spanner" and a "lockring tool," but they come in different sizes and shapes. There are a number of pin spanners that may work on various pin holes, such as the Park SPA-6, but the "green" pin spanner (the Park SPA-1) generally works best on bottom brackets. The "lockring tool" must match the number of "notches" in your lockring. The lockring pictured below appears to have 3 notches and probably requires a Park HCW-5 lockring tool. |
|||||||||||
|
|||||||||||
Use these tools and instructions for older bikes with adjustable cups, like the one pictured above. (More tools.) The diagram below can be used as a general guide. You have to remove both crank arms before you can remove the bottom bracket! The idea is to remove the lockring with the lockring tool, then remove the adjustable cup with the pin spanner. The adjustable cup should be easy to unscrew once the lockring is removed (but it is not always easy to unscrew, and it may require a large adjustable wrench instead of a pin spanner). Keep in mind that in a few cases, one or more parts may unscrew backwards (clockwise to unscrew), so don't use too much force at first. If you have an older bike and don't see tools that look like they will fit your adjustable cup, you can remove the fixed cup on the other side of the bike with the Park HCW-4 or HCW-6, though it isn't recommended. Look carefully at how your current spindle is inserted so you can be sure to install the new one the same way! Is one side longer than the other? (It probably is.) If you have to, write it down or take a picture. |
|||||||||||
|
|||||||||||
If you have an adjustable cup bottom bracket, it will have ball bearing "rings" (they're called "bottom bracket bearings") and a plastic tube, called a "spacer" or "sleeve," that are separate from the spindle (the "tube" isn't pictured above). You can reuse the ball bearing rings and plastic "tube" if you're replacing your spindle with one of a different length (which will probably have the same offset). The ball bearing rings sometimes stick inside the bottom bracket shell, so you may need to pop one of them out with your finger. If your ball bearings rings are worn, you can replace them. Count the number of balls so you'll know what size to buy. (If you see more than one listed with the same number of balls, buy all of them - they're usually less than a buck.) Extremely worn balls will be oval shaped, and tend to fall out of the ring. If you plan on riding your bike while you order new ball bearing rings, keep up with the balls. You can replace older adjustable cup bottom brackets with newer cartridge type bottom brackets, but you'll probably need to experiment. Most cartridges are symmetrical. One important factor is the "shell length," which is usually 68mm for such upgrades, though there are three standard shell lengths (68, 70, and 73mm) and a few rare shell lengths. Upgrades are discussed in more detail at the end of this section (click here). If you decide to upgrade to a cartridge, be sure to get the shape you need (they make cartridges in all shapes, but adjustable cup bottom brackets are usually only square-taper, so it is probably best to use a square-taper cartridge). Read on to find out more about cartridge type bottom brackets. 5.8 - Cartridge Type Bottom Brackets: Examination and Removal For newer bikes with cartridge type bottom brackets (5), your bottom bracket will look similar to the picture below (the yellow part will probably be silver). Cartridge-type bottom brackets usually require a "bottom bracket tool," but other tools may be required. The cartridge pictured below probably requires a Park BBT-22 bottom bracket tool. |
|||||||||||
|
|||||||||||
Use these tools and instructions for cartridge type bottom brackets, like the one pictured above. (More tools.) The diagrams below can be used as a general guide. You have to remove both crank arms before you can remove the bottom bracket! |
|||||||||||
|
|||||||||||
The idea is to to remove the "fixed flange" using a bottom bracket tool that has the same number of "splines" as your cartridge. Removing the "fixed flange" removes the cartridge. Since it is hard to tell which side is the "fixed flange," you may end up removing the "removable ring" first. Keep in mind that in a few cases, one or more parts may unscrew backwards (clockwise to unscrew), so don't use too much force at first. |
|||||||||||
|
|||||||||||
If you have a chain guide or an E-type derailleur, the bottom bracket you use has to have the appropriate "offset" to make room for the chain guide or E-type front derailleur (this is not the same kind of offset required for specially designed offset cranks). I haven't seen any installations of these devices where the fixed flange of the cartridge is on the left side of the bike; if it were, there would be no offset and no issues. But most installations involve cartridges that have the fixed flange on the right side of the bike (that's the most common type of cartridge). Typical cartridges that have the correct offset for chain guides and E-type derailleurs sometimes require spacers along with the chain guide or E-type derailleur to fine-tune the offset. You have to use the right number of spacers (or spacers of the right "thickness") to make sure the right crank arm is even with the left. That way, the bottom bracket will be "symmetrical" as long as the chain guide or E-type derailleur is installed. The spacers can also be used to properly position a chain guide or E-type derailleur over the chainring (in addition to H and L screws and other adjustments). You can place the spacers on either side of the device. Placing the spacers to the left of the chain guide will move the chain guide farther away from the bike. Placing spacers to right of the chain guide will move it closer to the bike (see image below). If you are going to be removing your chain guide or E-type front derailleur but you don't want to replace your bottom bracket, you will need to additional spacers to fill the spot where the device was, or else the left crank arm will stick out further than the right (assuming the device was installed properly on a bottom bracket with the right kind of offset). Switching to a "symmetrical" bottom bracket will also even out the cranks if you've removed a chain guide or E-type front derailleur. If you need spacers, the "Profile Racing BB Spacer Kit" or some "Shimano BB-M952 spacers" will work in most situations involving chain guides or E-type front derailleurs. |
|||||||||||
|
|||||||||||
Look carefully at how your current cartridge is inserted so you can be sure to install the new one the same way! Is one side longer than the other? Are there any spacers? If you have to, write it down or take a picture. 5.9 - Purchasing and Installing a Replacement Bottom Bracket 5.9.1 - Getting started: No matter what kind of bottom bracket you have, you will probably have to buy the tools before you can buy a new bottom bracket. If you are installing an "adjustable cup" bottom bracket, you'll probably also need some bike grease (like Park PPL-1). Once you have the tools, you can remove the bottom bracket and see the stamp on it (6). The "spindle" or "cartridge" is usually stamped with a code or other description you can search for on the Internet. |
|||||||||||
|
|||||||||||
The code or description stamped on your existing cartridge or spindle should give you an idea of what you need to buy in terms of a new cartridge or spindle. After you disassemble the bottom bracket, do an Internet search for the code. This will tell you about the various sizes associated with your current cartridge or spindle. In some cases there is an actual "code" that is easy to search for, but in other cases it may be easier to search for some of the other information. If you can't find anything, include the words "bottom bracket" or "ISIS" (etc.) in your search. Once you find some data on your current spindle or cartridge, you can find out more about what it means by reading the information below, which describes buying a replacement cartridge or spindle. 5.9.2 - Buying/investigating "adjustable cup" bottom bracket spindles: Most adjustable cup bottom bracket spindles are "offset." Usually, this means the right side of an adjustable cup spindle is longer than the left, and it is intended for use with a older specially designed offset crankset to create an "offset chainline." Adjustable cup spindles are not intended for the kind of "offset" required by a chain guide or an E-type derailleur. Descriptions of the spindle size look like AxBxCxD (A,B,C, and D represent numbers, usually in millimeters), but you have to search for the code to get a description of the size (more info). First, try searching for information about the spindle you removed from your bike. D describes the overall length of the spindle. To move the pedals further away from the bike, you want D to be larger than your existing spindle length. To move the pedals closer together, you want D to be smaller than your existing spindle length. As far as I can tell, all you have to do is change D; everything else should fit properly (assuming you have cranks with the correct offset). If everything doesn't fit properly, you may be able to adapt a symmetrical cartridge bottom bracket to work with an offset crankset. See Appendix 2: Adapting a Symmetrical Bottom Bracket to Accept Offset Cranks for more information. In some cases, there may be adjustable cup bottom bracket spindles for sale that won't fit properly. To ensure a proper fit, make sure you always keep B the same, even when you change the length of the spindle (D). When you change the length of the spindle (D), A and C will typically change, too, so A and C won't usually match your existing spindle. But you do have to check to see if A and C are different from each other on your existing spindle (they probably are), and if they are, make sure A and C are different from each other on your replacement spindle (more info). In most cases, you will only need to be concerned with D. Unfortunately, the spindle length you need is not always easy to find (more info). And if you need a "symmetrical" bottom bracket, you probably won't be able to find what you need in an adjustable cup spindle. 5.9.3 - Upgrading from an adjustable cup bottom bracket to a bottom bracket cartridge: Of course, you can upgrade to a cartridge if you can't find the spindle length you need in an adjustable cup bottom bracket. It is also an easy way to change from older specially designed offset cranks to "symmetrical" cranks (more info). Whether you need an "offset" or "symmetrical" cartridge, it is a good idea to go with a square-taper cartridge if you are upgrading from an adjustable cup spindle. It is also a good idea to experiment with several square-taper cartridges, if possible. If you don't want an "offset" cartridge, the Shimano BB-UN54 bottom bracket cartridge will work with most "symmetrical" square taper cranks, and will fit most bike frames. It is also available in a number of sizes. Shorter spindle lengths (110mm and below) have a short-spindle offset designed for specific cranksets. If you have offset square-taper cranks designed for use with a short-spindle bottom bracket, the BB-UN54 MM107 (107mm) or the Sugino BB105 or CBB-103 (103mm) should have the appropriate offset. These cranks are often sold for use with "fixies." Be sure to read the information below about how to tell what size cartridge to buy. If you want a square-taper cartridge with the kind offset needed to accommodate an E-type front derailleur, the Shimano BB-UN26 will usually do the job (though spacers may be needed), and it will fit most bike frames (it should also work with certain chain guides, along with appropriate spacers). The BB-UN54 can also sometimes be found in an E-type. But if you bought some specially designed square-taper cranks that create an offset chainline, you usually won't be able to use them with a chain guide or an E-type front derailleur. However, you may be able to adapt the bottom bracket to work in those cases. See Appendix 2: Adapting a Symmetrical Bottom Bracket to Accept Offset Cranks for more information. If you have Campagnolo cranks, Campagnolo makes ISO square-taper cartridges (such as the Veloce and similar SC-S cartridges, as well as a few others) in a number sizes, and they will fit most bike frames (4). (You will also need a Park BBT-4 bottom bracket tool.) If your new cranks came out even on both sides of the bike with your old adjustable cup spindle, you probably want a cartridge that has an offset designed for your cranks. You may want to upgrade to an offset cartridge if you couldn't find the spindle length you wanted in an adjustable cup spindle. But your choices will be limited because most cartridges are "symmetrical," and the ones described as "offset" are intended for chain guides or E-type front derailleurs, not the specially designed offset cranks used on older adjustable cup bottom brackets. But you may be able to adapt a symmetrical cartridge to work with specially designed offset cranks. You can also use Phil Wood square-taper replacement cartridges, which offer offset (as in specially designed offset cranks) as well as symmetrical options (see Appendix 2: Adapting a Symmetrical Bottom Bracket to Accept Offset Cranks for more information). If you decide to go with Phil Wood, you will also need to buy a Phil Wood bottom bracket tool and Phil Wood "cups" (most cup threads are "British/English" (4), but Italian bikes have "Italian" threads; other threads are more rare) (more info). Phil Wood cartridges also come in different sizes, and fit most bike frames. Information about buying the right size cartridge is included below. No matter what size cartridge you buy, make sure you get the right "shell length." The "shell length" refers to the part of the bike frame where the cartridge is inserted, and it is usually 68mm for bikes with adjustable cup bottom bracket systems, though there are three standard shell lengths (68, 70, and 73mm) and a few rare ones. Read on to find out more about buying a cartridge. 5.9.4 - Buying/investigating bottom bracket cartridges: Information about "cartridge" type bottom brackets can include a code (such as "UN54") or other information that you can search for, along with two numbers (P and Q). P and Q are typically in millimeters. P is the length of the bottom bracket shell, which is the part of the bike frame the cartridge screws into (usually 68, 70, or 73mm, though there are a few rare sizes). Q is the length of the spindle, which is what you are trying to change (Q is the same measurement as D on an adjustable cup spindle). First, try searching for information about the cartridge you removed from your bike. With cartridges, the spindle length (Q) is usually stamped right on the cartridge. To move the pedals further apart, Q should be larger than the spindle length of your current cartridge. To move the pedals closer together, Q should be smaller than the spindle length of your current cartridge. You have to keep P the same as your current cartridge, but this may involve measuring your bottom bracket shell if you cannot find the information any other way (e.g. it may be stamped on the cartridge, or it may turn up in an Internet search for the code). When you buy a cartridge, it is not always easy to tell what size it is. Some cartridges are listed as PxQ, but they may also be listed as "Spindle 120, Shell 68/73" (which means the cartridge has a 120mm spindle and is available in two shell sizes - 68 and 73mm). If your current cartridge has other information, such as a code (like "UN54"), it may be available in a number of sizes. For the most part, you won't need to worry about the threads, because the threads are usually specific to to the shell length (i.e. there are no 70mm cartridges with British threads, though there are a few rare threads out there). You probably won't need to worry about any "offset," either, unless you have a chain guide or an E-type front derailleur, or unless you need a short spindle. You have to be willing to experiment with different cartridges that fit your bike. The cartridge you buy may turn out to be a perfect fit even though it was made to work with a different crankset. |
|||||||||||
|
|||||||||||
5.9.5 - Finishing Up: Trying Out the Bottom Bracket: Once you find out what you need, you can reassemble everything and try it out. Your cranks should now fit you perfectly! |
|||||||||||
Conclusion |
|||||||||||
| It seems like the best cyclists have bikes that fit really well, while the rest of us ride bikes that don't quite fit. A bike that doesn't fit properly can cause a number of problems for the rider. I hope this information will help you get a bike that fits, so you can have an effective, enjoyable ride into the green revolution! |
Appendix 1: Shift and Brake Cable Adjustments |
||
A1.1 - Examining Your Equipment If you have to replace your shift and brake cables as a result of your bike fitting experiments, or for any reason, you first need to figure out what kind of shift levers and brake cables you have. If you twist or squeeze your shift levers to change gears, or if you have combination brake/shift levers, you may want to head to a bike shop. There are too many designs for me to try and explain how to take them all apart. But I do have an "all-purpose" (or "work-around") solution that should work no matter what kind of shift levers you have. Otherwise, the only shifters this appendix covers are "toggle style" (friction) shift levers found on older bikes, but you can apply the information as you wish. The same goes for hydraulic brakes. Although I've included some information about hydraulic brakes as part of the "all-purpose" solution, you may want to head to a bike shop if you have hydraulic brakes. |
||
|
||
|
||
|
||
Now go ahead and loosen the tension bolt (the bolt where the cable is attached to the caliper) with an adjustable wrench, hex wrench, or screwdriver (see picture above). Pull the cable away from the bolt. The cable can be attached to the bolt in various ways, and usually is wrapped around something, threaded through something, etc. Once you have the cable separated from the bolt, squeeze the brake lever on the handlebars. You should see cable pull through the cable housing. When you release the brake lever, in most cases you will see the other end of the cable sticking out of the brake lever. Keep in mind if you don't see the other end of the cable at first, you might have to push the cable through the housing with your hand, or play with the brake lever some more. Sometimes you can only see the end of the cable while you are squeezing the lever. If you don't see the end of the cable, you may want to consider using the "all-purpose method." If you see the end of the cable by the brake lever, take a close look at the shape of the cable end. |
||
|
||
A1.2 - Purchasing New Cables and Cable Housing Now you can go buy your brake and shift cables. If you couldn't see the cable end as described above and have decided to use the "all-purpose" method, you still need to buy this stuff, so make an educated guess (it won't matter if you're wrong). Some information about hydraulic brakes is also included in the all-purpose method, so if you have hydraulic brakes, you may want to purchase a hydraulic brake repair kit (you'll be relying on the instructions that come with it!). If you need to reattach a brake cable so you can ride your bike, click here. Regardless of whether or not you are using the "all-purpose method," you still need to buy two shift cables and two brake cables. If you buy them in a set and one is longer than the other, the long ones are for the back of the bike. You will also need to buy some cable housing (the cable housing is the flexible "tubing" the cables run through). Sometimes you can buy housing and cables all packaged together, but be sure you end up with everything you need (two cables with two ends for brakes, same for shifters, etc.). You can replace all of the housing on your bike (which isn't described here) or just the housing by the shift levers and brake levers (the housing on the handlebars). Some handlebars allow the cable to be threaded inside the handlebar, but there is usually still cable housing coming out of the handlebars. If you don't buy your cables and housing packaged together, you may have to choose between various types of cable housing. There are two common types of cable housing (one for shift, and one for brake), but they are interchangeable for the most part (the shift levers can be harder to move if you use brake housing, and the shift housing might not hold up if you use it on your brakes). Brake cable housing is easier to cut. There is also a special type of "braided" housing designed for use with either shift or brake cables. I've been to a number of bike shops that have huge spools of housing in the back. The different types of housing they stock may vary in diameter and flexibility, and may be sold according to the type of bike you have and your riding style. Some housing is designed to make the cables easier to slide, or it may simply last longer than other housing designs. Your cables should fit in any type of housing, but they may be easier to slide in certain types of housing. The cables themselves can also vary slightly in diameter and strand width, and may be offered in various colors with a number of different coatings. Sometimes the coatings are intended to work with cable housing specifically designed for that cable. But the cables will fit into any type of housing and still work, though they may not move as smoothly or last as long. You will probably also need to buy some ferrules (pictured below). You won't know where they go until you remove some of the old cable housing on your bike. You will need to make sure the ferrules you buy are the right diameter for your housing, unless the ferrules are included with the cable housing (they frequently are). |
||
|
||
|
||
A1.3 - Getting Started First, take a picture or write down the way the cable and housing attaches to the bike and various components so you will know how to route the new cable and housing (the front derailleur can be tricky). Then, shift your bike into the outermost gear on the back (the smallest gear), and the innermost gear on the front (the smallest chainring). Loosen the tension bolts on the front and rear derailleurs and separate the cable from the bolt. The cable can be attached to the bolt in various ways, and usually is wrapped around something, threaded through something, etc. |
||
|
||
Do the same for the front and back brake calipers (be sure to take notes or take a picture if needed). You can wiggle and squeeze the shift and brake levers to help get the cable started, or push the cable into the existing housing. Don't pull the cables out, just get them started for now. If you have hydraulic brakes, now is a good time to bleed the system (more info: 1 | 2 | 3). Click here if you're not using the "all-purpose" or "work-around" method. A1.4 - Installing the Cables: All-Purpose Method (there's nothing wrong with Super Glue!) The basic idea of the "all-purpose method" is to avoid removing the cables from the shift and/or brake levers while still lengthening the cables and housing. To accomplish this, the existing cables will be spliced to make them longer. Everything has to be done in fairly precise order to make it work. This method also includes some information about hydraulic brakes (which don't use cables), but the information relies on additional instructions. If you would prefer to run all new cables instead of using the "all-purpose method," click here. A1.4.1 - Installing the stem and handlebars: By now, you should be familiar with many of the adjustments, clamps, and components associated with the handlebars. So, go ahead and put the handlebars where you want them (like onto a new stem) without un-doing anything more than you already have. The housing around the handlebars may pull loose from the bike, but don't pull the housing off of any of the cables. And don't worry about the cables pulling away from the derailleurs or brake calipers (you might even need to help them along). If you have hydraulic brakes, remove the old hoses as needed (more info: 1 | 2 | 3). You may have to remove all of the components from your handlebars because of the style of stem you have, or you may be replacing the handlebars. If that is the case, go ahead and remove all of the components (levers, etc.) from the handlebars; just don't remove the cables from any of the brake or shift levers. Remove any handlebar tape, then use an adjustable wrench, hex wrench, or screwdriver to remove the levers from the handlebars. For brake levers, you sometimes have to squeeze the brake levers and shine a flashlight in the crack that opens up to access the clamp screw, and the brake cable has to be loose enough to push out of the way; other times there is a clamp bolt is outside of the lever. You can leave the brake and shift levers dangling from the bike frame until you attach the stem and/or handlebars. Don't worry about the cables pulling away from the derailleurs or brake calipers (you might even need to help them along). If you are removing the levers from the handlebars and some of the cables run inside the handlebars, you're going to have to unthread the cable from all of the housing on the bike. Just don't pull the cables out of the levers themselves. It is also probably a good idea to use replacement handlebars that allow the cables to be threaded into the bar, just to avoid problems and make things easier. When you're done unthreading the cables from the bike and all of the housing, slide the pieces of old housing that attached to the handlebars back onto their respective cables (your only concern is for the housing that actually touched the handlebars). There is no need to rethread the cables through any other housing or attach them to any other part of the bike. Now put the handlebars back onto the bike and reattach the levers. At this point, whether or not you had to remove all of the components from the handlebars, you should have your handlebars attached to the bike with the same cables and housing, though the cables may have pulled out of other parts of the bike. Check to see if the housing around the handlebars is too short to attach to the bike properly. Be sure to turn the front wheel all the way to the left and right and check for binding. If the housing is too short around the handlebars, now is the time to replace it. If not, just re-attach the housing to the bike and pull the cable through. Re-thread any cable into the rest of the housing on the bike that may have pulled out. Continue until you reach the brake calipers and derailleurs (or go as far as you can before you run out of cable). Then click here to splice or reattach the cables to the derailleurs and brake calipers. A1.4.2 - Replacing the cable housing: If you need to replace the housing around the handlebars, go ahead and unpackage your new housing. If there is a cable already threaded through the housing (if you bought cables and housing packaged together), pull the cable out of the housing. You probably want to cut the new housing in lengths slightly longer than the pieces of old housing (the old housing should still be on the cables attached the handlebars, possibly with a huge gap!). You can hold the new housing up to the bike and see how much "slack" (extra length) you need. Be sure to turn the front wheel all the way to the left and right so you leave enough slack for the front wheel to turn without pulling on the cable housing. You can add a bit more slack just to be safe... ...But let's say you you want to avoid the splicing procedure described below, and you saw a few inches of extra bare cable sticking out of a derailleur before you started. To avoid splicing, you can subtract about a half-inch from the amount of bare cable you saw sticking out of the derailleur, and add the difference to the length of the old housing. That will tell you how long you can cut the new housing for the cable that runs to that derailleur and still avoid splicing. Unfortunately, the cable might simply not be long enough to get away with that. If that's the case, you'll have to follow the cable-splicing procedure described below... Once you've made up your mind, go ahead and cut the new housing to the lengths you need. Make a swift, strong cut with heavy duty wire cutters. Examine the cut end of the cable housing for bent pieces of metal blocking the "hole" through the housing. You can try bending the metal out of the way with pliers, but you should probably just make another cut. You may need better wire cutters or lineman's pliers. Once the cable housing is cut into the lengths you need, slide the new ferrules onto the ends of the housing as appropriate (look at your old cables again to be sure). You can also squirt a drop of chain oil into the cable housing for smoother functioning. Now go ahead and unthread the cable from all of the old housing on the bike and handlebars, but do not remove the cable from any of the levers (if your handlebars had cabling inside the bars, the cables will already be unthreaded from the bike, as described above). Then remove the old housing from around the handlebars by gently pulling it off. If you have hydraulic brakes, use your hydraulic brake repair kit to adjust the length of the hoses (more info: 1 | 2 | 3). The cables should now be dangling from the handlebars without any housing. Slide the new housing you measured onto the bare cables. Attach the new housing to the bike and pull the cable through. Complete all of the cable threading into the rest of the housing on the bike until you reach the brake calipers and derailleurs. A1.4.3 - Splicing the cables: If the cables don't reach the brake calipers or derailleurs, you can splice in some of the new cable you bought. You can use cable housing stops (pictured below) to attach to the frame just about anywhere. A cable housing stop has the cable housing going into one side of the housing stop, and the cable coming out of the other side without the housing (see images below). You can cut the bare cable sticking out of the cable housing stop and splice on another piece using a very small nut and bolt, which will remain exposed outside of the housing along with cable. Use a tiny nut and bolt because you don't want it to bang into the frame. You have to pick a good spot to attach the cable housing stop. It should be up against a straight part of the bike frame where you can mount one or two housing stops. You'll probably need a second housing stop to resume the route of the existing cable housing. You can attach most housing stops with an adjustable wrench, hex wrench, or screwdriver. You can also bend them and zip tie them in place if they do not fit exactly right, though "adjustable" stops may be available. Some bikes already have places where the cable is exposed for design purposes, along with cable housing stops built into the frame (which really makes this easy). Of course, a few bikes have part of the cable threaded inside the frame of the bike so that you can't see the cable. You may have to move it outside the frame if you can't find any good spots to attach the housing stops. The front brake is probably going to be tricky. You can probably find a spot on the handlebars. Keep in mind that you can just run a new cable for most brake levers. This might help cut down on excessive splicing! Just read about brake cables in the section below. Or, click here to if you're ready to re-attach the cables to the derailleurs and brakes. |
||
|
||
|
||
A1.5 - Installing the Cables: New Cables for Friction Shifters and Most Brake Levers If you have "toggle style" friction shift levers and want to run new shift and brake cables, or if you just want to run new brake cables, go ahead and write down or photograph how the cables are threaded, and how the housing is attached. Then, unthread the cables from all of the housing, and remove the cables from the shift and/or brake levers. You should have already loosened the cables from the brake caliper and derailleur tension bolts, and played with the levers to get the cable started. Again, you can also push the cable through the housing to get it started. Sometimes, you can only remove the brake cables while you are squeezing the brake lever. Once you get the cable started, grip it at the end up by the levers and pull it all the way out. Then you should just be able to gently pull the existing housing off your handlebars. Take a look at the housing. Does it have a ferrule at one or both ends? That's where your new ferrules will go on the new housing. You may have to remove all of the components from your handlebars because of the style of stem you have, or you may be replacing the handlebars. If you need to remove the brake levers from the handlebars, remove any handlebar tape, then use an adjustable wrench, hex wrench, or screwdriver to remove the brake levers. Sometimes you have to squeeze the brake levers and shine a flashlight in the crack that opens up to access the clamp screw, other times there is a clamp bolt is outside of the lever. The shift levers are usually attached to the stem or the frame of the bike (the downtube), assuming you have friction shift levers. If you need remove the shift levers, just remove the bolt from the clamp that holds the levers to the stem or downtube. Don't remove the levers from the clamp itself, because it is difficult to put the levers back together. When you have completed work on the handlebars and stem and they are securely attached to the bike, reattach any levers. Now unpackage your new housing. If there is a cable already threaded through the housing (if you bought cables and housing packaged together), pull the cable out of the housing. You probably want to cut the housing in lengths slightly longer than the pieces of old housing you pulled off the bike. You can hold the new housing up to the bike and see how much "slack" (extra length) you need. Be sure to turn the front wheel all the way to the left and right so you leave enough slack for the front wheel to turn without pulling on the cables. Then add a bit more slack just to be safe (you don't want the cables to tangle, either, so use good judgment; and don't use so much housing you run out of cable!). Cut the cable housing to the lengths you need. Make a swift, strong cut with heavy duty wire cutters. Examine the cut end of the cable housing for bent pieces of metal blocking the "hole" through the housing. You can try bending the metal out of the way with pliers, but you should probably just make another cut. You may need better wire cutters or lineman's pliers. Once the cable housing is cut into the lengths you need, slide the new ferrules onto the ends as appropriate (look at your old cables again to be sure). You can also squirt a drop of chain oil into the cable housing for smoother functioning. Once your new lengths of cable housing are ready, attach the new housing to the levers and bike just as the old housing was attached. Sometimes there isn't much "holding the housing in place," but give it a shot. It will help you make sure you don't forget any of the housing when you thread the cable, and it is your last chance to check the measurements. Now thread the new cables into the levers, components, and housing. One end of the cable should have a special shape (pictured above), and the other end should have a nice clean cut. In some cases, you may have to cut off one of the ends yourself (if so, make a quick, strong cut with wire cutters or lineman's pliers). You can start with a brake lever and brake cable. Take the cut end of the cable (without the shape) and thread it through the brake lever. Pull it all the way through the brake lever. Does the brake lever look like it did with the old cable? It should. Now thread the cable through the piece of housing that attaches to the brake lever (it will probably have a ferrule), and snug the housing into the recess on the brake lever (again, it should look like it did before). Now do the other brake lever and the shift levers. Complete all of the cable threading using the housing until you reach the brake calipers and derailleurs. |
||
A1.6 - Attaching the Cables to the Derailleurs and Brakes A1.6.1 - Derailleurs: To reattach the shift cables to the derailleurs, first make sure the shift levers are in the correct position. The shift lever for the front derailleur should be set as though the front derailleur is in position for the lowest gear (the innermost chainring). Push, pull, squeeze, or turn until the lever stops. The shift lever for the rear derailleur should be set as though the rear derailleur is in position for the highest gear (the outermost gear). Again, push, pull, squeeze, or turn until the lever stops. Once the levers are set, pull the cable tight with the pliers at the tension bolt down by the derailleur. Attach the cable to the tension bolt on the derailleur, and tighten the bolt. Remember to keep tension on the cable while you are tightening the bolt. Test the gears by rotating the pedals with your hand and moving the lever. You can lift up on the bike or use a bike stand. If you notice any gears not working, or if you see that the cable (not the housing) looks loose in certain gears, you need to tighten up the cable. Just loosen the tension bolt on the derailleur, pull on the cable some more with the pliers, and re-tighten the bolt. Be sure to shift back into the appropriate gear (the smallest sprocket or chainring) before re-tightening anything! You shouldn't have to adjust the "H" and "L" screws, but you might have to if you need to "fine tune." Most derailleurs have two very tiny screws marked (H) for high and (L) for low. |
||
|
||
- For the front derailleur: The screw marked "H" controls the outermost front gear (the largest chainring) and the screw marked "L" controls the innermost front gear (the smallest chainring). If you turn the screw marked "H" too far one way, the chain will fall off the bike when you move the handlebar shift lever into high gear. If you turn "H" too far the other way, you won't be able to access the largest gear; the chain won't quite make it onto the largest chainring no matter how hard you pull on the lever. The "H" screw has to be set just right. The screw marked "L" works the same way, except it is for the smallest chainring (more info). - For the rear derailleur:The screw marked "H" controls the outermost rear gear (the smallest sprocket) and the screw marked "L" controls the innermost rear gear (the largest sprocket, next to the spokes). If you turn the screw marked "H" too far one way, the chain will fall off the bike when you move the handlebar shift lever into high gear. If you turn "H" too far the other way, you won't be able to access the smallest sprocket; the chain will rattle and never change into the outermost rear sprocket. The "H" screw has to be set just right. The screw marked "L" works the same way, except it is for the largest sprocket (up next to the spokes). A1.6.2 - Brakes: To reattach the brake cables to the brake calipers, attach the cable to the brake caliper (or disc) at the tension bolt and pull the cable tight. Keep tension on the cable with pliers while you tighten the bolt. Test the brakes by squeezing the brake levers. If they aren't tight enough, try twisting the screw adjuster where the housing meets the the brake lever. It is the rotatable barrel-shaped cover around the recess where the cable housing fits into the brake lever, and you can turn it with your fingers. |
||
|
||
If that doesn't work, loosen the tension bolt on the brake caliper, grab the brake caliper with your hand, and squeeze it closed a little bit (but not all the way). Pull the cable as tight as you can with the pliers while still squeezing the brake caliper, then put the pliers down and tighten the tension bolt while still squeezing the brake caliper (unless you have three hands). If you have hydraulic brakes, follow the instructions on your repair kit to reattach the hoses and refill the fluid reservoir (more info: 1 | 2 | 3). A1.6.3 - Finishing up: You will probably still need to trim the cables sticking out of the tension bolts on the derailleurs and brake calipers, especially if there is more than a few inches sticking out. You do want some excess cable sticking out, but usually only a few inches. If needed, make a quick, strong cut with wire cutters or lineman's pliers. Then attach a cable tip to keep the cable from fraying. Use pliers to crimp the cable tip in place (just squeeze it really hard with the pliers). |
||
|
Appendix 2: Adapting a Symmetrical Bottom Bracket to Accept Offset Cranks |
||
| If you have
a set of specially designed offset cranks,
this appendix is for you. In most cases, these cranks were designed to fit
on an offset bottom bracket, such as the adjustable
cup square-taper bottom brackets typically used on older bikes. Nearly
all of these bottom brackets were "offset." There are also some
newer cranks with a similar offset that are designed for short-spindle
bottom brackets (they are often sold for "fixies").
Although they can be adapted to fit symmetrical cartridges, you are probably
better off buying a short-spindle cartridge, such as the Shimano BB-UN54
MM107 or the Sugino BB105 or CBB-103. This solution will not
work if you have a symmetrical crankset and a newer short-spindle bottom
bracket! For a typical set of older offset cranks, the right side of the bottom bracket spindle is longer than the left. It has the effect of moving the chain farther away from the bicycle (called an "offset chainline"). You can't really tell whether a square-taper crankset has this kind of offset unless you put it on a bike and try it. (By the way, this kind of offset has nothing to do with an "E-type front derailleur," but you may be able to use an E-type front derailleur in conjunction with specially designed offset cranks by adapting a bottom bracket.) If you put these cranks on a bike with a "symmetrical" bottom bracket, the left crank arm sticks out farther from the bike than the right. This might also happen if you put them on a bike that has an offset bottom bracket with the wrong offset. Most "cartridge-type" bottom brackets are "symmetrical." If you put offset cranksets on a symmetrical bottom bracket, the cranks will probably come out uneven. Most offset cranks have a square taper bottom bracket, and symmetrical square-taper cartridges are widely available. So it is easy to end up with uneven cranks. And offset adjustable cup bottom brackets are getting hard to find. Although there are some cartridges described as "offset," they are for "E-type front derailleurs" or "chain guides," not specially designed offset cranks. So, if you have a set of specially designed offset cranks, you are going to need an offset bottom bracket designed to fit them if you want your cranks to come out even on both sides of the bike. But a bike with a symmetrical square-taper bottom bracket is not very easy to switch to an offset adjustable cup bottom bracket. And if you are trying to replace an adjustable cup bottom bracket, the spindle length you need may be hard to find without upgrading to a cartridge. Oftentimes, a Phil Wood square-taper cartridge is the best option. You can change from a symmetrical square-taper cartridge to an offset Phil Wood cartridge if you are replacing symmetrical cranks with specially designed offset cranks. You can also upgrade an offset adjustable cup bottom bracket to an offset Phil Wood cartridge if you have specially designed offset cranks and can't find an adjustable cup spindle in the length you need. But if you decide to go with Phil Wood, you will need to buy a Phil Wood bottom bracket tool and Phil Wood "cups" (most cup threads are "British/English" (4), but Italian bikes have "Italian" threads; other threads are more rare) (more info). Phil Wood cartridges come in different sizes, and fit most bike frames. Make sure you buy the right size cartridge! It may also be possible to adapt a symmetrical cartridge, such as the Shimano BB-UN54 (in most sizes), to work with any set of specially designed offset cranks. In order to adapt the cartridge, you need to be able to insert the cartridge into the right side of your bike (that's the norm for most bikes), and the cartridge spindle cannot be below a certain minimum length. Bikes with 68mm bottom bracket shells require a cartridge spindle length of at least 110mm to adapt it for use with an offset crankset. That assumes you are trying to offset the cartridge 2mm. The spindle can be shorter if you need less of an offset; most people need between 1 and 4mm. Adapting a cartridge for a longer bottom bracket shell requires longer cartridge spindle. Assuming a 2mm offset, the cartridge spindle needs to be at least 110mm long for a shell of 70mm, and at least 113mm long for a shell of 73mm. Aside from these size requirements, there is a lot involved in buying a cartridge, so be sure you buy a size that will fit on your bike. And don't forget to consider "q-factor" when buying a cartridge! To create the offset, you will need some spacers. Two "Shimano 1mm BB-M952" spacers are shown below, but BB-M952 spacers come in different "thicknesses." There are other spacers that should work, too, such as the spacers in the "Profile Racing Crank BB Spacer Kit." You put the spacers on the fixed flange of the cartridge, and insert the cartridge into the right side of the bike. In some cases, one of the cranks may still stick out farther than the other by a fraction of a millimeter. A rubber band or other flexible gasket (including a number of "bottom bracket gaskets") along with a spacer might balance it out; the "Profile Racing Crank BB Spacer Kit" may also have a spacer that will work. If you want to use an E-type front derailleur or chain guide with your specially designed offset cranks, you can just use it in place of a spacer (don't forget to place the spacers on the correct side of the E-type front derailleur or chain guide). You'll probably need to try different combinations of spacers, but you can also try to measure between the cranks and the seat tube to see how much offset you need. In most cases, a Park BBT-22 bottom bracket tool can be used to tighten it all up when you're done. The removable ring on the left side of the bottom bracket can usually be tightened up with the same tool.The illustration below shows how it all works. |
||
|
||
|
Appendix 3: Fixie and Single Speed Conversion |
||
| There are
a lot of good reasons to convert your bicycle into a fixie
or a single-speed.
Some people may have an older bike with broken shifters, and want to make
the bike ridable again. Other people may be looking for a different riding
experience, or for a bike that can do new tricks (for example, you need
a fixie to "ride backwards"). Both fixie and regular single-speed
bicycles offer simplicity and easy maintenance, and both are enjoyable to
ride. A3.1 - The Difference Between a Fixie and a Single Speed A fixie (also called a "fixed gear bike") is technically a type of single speed bicycle, but it is different from other single speeds. When someone says they have a "single-speed," they do not normally mean they have a "fixie." So, "fixie" and "single-speed" have come to refer to two different types of bicycles. But fixies and single-speeds do have one important thing in common: they both have only one gear. Fixies and single-speeds have no shifters, and no extra gears to shift into. The main difference between a fixie and a single-speed is that when you stop pedaling on a fixie, the fixie pedals you. Because a fixie has a "fixed gear," there is no way to stop the pedals from going around as long as the bike is moving. A regular single-speed bike uses a "pawl system" instead of a "fixed gear." A pawl system is also used on most bikes with multiple gears. When you stop pedaling on a bike with a pawl system, the pedals stop going around. You can usually hear the familiar "click-click-click" of the pawl system when you coast downhill. When you go downhill on a fixie, the pedals start going around faster and faster. You can use your legs to resist the force of the pedals and slow the bike down. Of course, that explanation will probably confuse some people. Some people will probably think of "coaster brakes" that engage whenever the rider tries to "backpedal." But a fixie doesn't work that way. You can't really "backpedal" a fixie while rolling down a hill (unless you do a skid). To slow a fixie down, you just resist the force of the pedals with your legs. Because you can slow a fixie down by using your legs to resist the force of the pedals, some people remove the rear brake from their fixie. In a few cases, people remove both the front and rear brakes (more info), but this is usually because they have a certain type of track bike that will only be ridden inside of a velodrome. Do NOT remove the front brake from your fixie! A3.1.1 - What is a track bike? Traditionally, "track bikes" are made to be ridden on a special arena-style bike track called a "velodrome." Traditional velodrome track bikes are fixed gear bicycles with no brakes, and no place to attach brakes. The overall shape of the bike is similar to a road bike, but with slight differences (more info). Track bikes also have other features unique to velodrome racing. Because a track bike has a fixed gear, some people use the term "track bike" and "fixie" interchangeably. Other people use the term "fixie" to refer to any bike that has been "converted" into a fixed gear bike, and use the term "track bike" to refer to a brand-new fixed gear bicycle. But a brand-new "track bike" is likely to come with brakes, or at least a front brake, and will probably never see the inside of a velodrome. So, I guess the bottom line is that "track bike" can mean different things to different people. If you decide to convert an existing bike into a fixie, you will probably need some parts that are sold for "track bikes." Sometimes, parts sold for track bikes have to be adapted to fit other types of bikes. For example: - The rear wheel on a track bike has shorter axle spacing than most other bicycles. - Track bikes sometimes use a wider chain than other bicycles, so the teeth on "track cogs" and "track chainrings" are sometimes wider. Information about adapting track bike parts to fit other bikes is described in more detail later. A3.2 - Getting Started: Fixie and Single Speed Conversion At this point, you should be thinking about whether you want to convert your bike into a fixie, or into a regular single-speed bike. But you don't have to decide yet! In fact, you might not ever have decide, because there is one type of conversion that lets you have both! But there are other factors that you will probably want to consider, such as the amount of work involved and the design of the bike you're converting. That said, you can make any bike into a fixie or a regular single-speed if you want to. A3.2.1 - Dropouts: "Dropouts" are the part of the bike frame where the wheels attach. It makes it a lot easier to convert a bike into a fixie or a regular single-speed if the dropouts for the rear wheel are "horizontal." But that doesn't mean it's impossible to convert a bike with "vertical" rear dropouts... |
||
|
||
|
||
|
||
A3.2.4 - Fixie hubs: For most fixie or single-speed conversions, you can just buy a track wheel (with a hub) that fits your bike (see sections A3.2.2 and A3.2.3). But since there are only three sizes (diameters) available, you might not be able to find the right size. When that happens, you usually have to buy a "fixie hub" and have it installed on an ordinary wheel that fits your bike. The hub is the center part of wheel where the axle is attached; it's also where all the spokes meet. Re-doing all of the spokes on a bicycle wheel is probably not something you'll want to try to do yourself, and that's what's involved in installing a fixie hub onto an ordinary wheel. Sometimes you can use your old wheel, but you might have to buy a new wheel. Either way, it's something you'll probably have to get a local bike shop to do for you, although there are some online bike shops that build custom wheels. |
||
|
||
| Putting a fixie hub on an ordinary wheel is currently the best option for most BMX bikes, since they often have 20 inch wheels. There are also bikes with 24 inch wheels that fall into this category (including BMX bikes with 24 inch wheels). Of course, if your BMX has 26 inch wheels, you can just buy a 26 inch track wheel (described in section A3.2.2). A3.3 - Removing Your Old Equipment A3.3.1 - Removing the chain: The "gears" on the back wheel of the bike usually have a device called a rear derailleur that will let you loosen the chain. Then you can slip the chain off of the chainring up by the right pedal. Loosening the chain is a good start toward removing it, but you still have to take it off the rest of the way. For now, you can just leave the chain hanging from the bike frame. Section A3.6.3 describes how to remove and resize the chain. A3.3.2 - Opening quick-release brakes: Before you remove the rear wheel, you're probably going to have to open up the brake calipers so the wheel will slide out. Some bikes have a quick-release brake caliper that makes it easy to remove the wheel. It opens the brake caliper up slightly so you can remove the wheel without un-doing the brake cables. Some quick-release brakes work by way of a "toggle" right on the brake caliper, but it depends on the design of the caliper. The brake levers on the handlebars sometimes have a similar feature that opens up the brake calipers slightly (it might look like a button somewhere on the lever, but it depends on the design of the lever). Brake levers and brake calipers can also have "tension adjusters" that will open up the caliper, but that probably won't open it wide enough (tension adjusters are usually "barrel shaped" and have cable housing inserted into one side; you screw/unscrew them). |
||
|
||
A3.3.3 - Loosening or removing the rear brake: If you don't have any sort of quick-release brakes, you're probably going to have to loosen the brake cable so the rear wheel will slide out. You might also want to consider removing the rear brake if it doesn't have a quick-release feature; that way it will be easier to "flip-flop" a track wheel. If your brakes are hydraulic and don't have cables, here is some more info: 1 | 2 | 3. To loosen the cable for the rear brake, begin by taking a look at your brake caliper (or in some cases, your disc). The caliper is down by the wheel. Can you see where the cable is fastened to the caliper? Sometimes it can be hard to see. It is usually silver, but it may be black or another color. You're looking for bare wire, not the flexible "tubing" that the cable runs through (the tubing is called cable housing). The cable should attach to the brake with a small bolt called the "tension bolt" (see image below). Go ahead and loosen the tension bolt with an adjustable wrench, hex wrench, or screwdriver. Then squeeze the brake lever on the handlebars. You should see cable pull through the cable housing. When you release the brake lever, in most cases the brake caliper will open up. To retighten the cable after your new wheel is installed, click here. |
||
|
||
If you have rear disc brakes (as opposed to caliper brakes), the disc itself will be attached to the wheel. You're going to have to figure out how to remove the disc from your old wheel and attach it to your new wheel if you want to continue using the rear brake (the rear disc probably requires a special tool). But you can't "flip-flop" a wheel with disc brakes very easily, so it is probably best to remove the rear brake if you have disc brakes. You should be able to remove the cable as described below. Whether you have caliper or disc brakes, if you want to go ahead and remove the rear brake, you need pull the cable away from the tension bolt. The cable can be attached to the bolt in various ways, and usually is wrapped around something, threaded through something, etc. Once you have the cable separated from the bolt, you can try squeezing the brake lever again to see if you can find the other end of the cable sticking out of the brake lever. You can also push the cable through the housing to get it started. Sometimes, you can only remove the brake cable while you are squeezing the brake lever. Once you get the cable started, grip it at the end up by the lever and pull it all the way out. Then you should just be able to gently pull the cable housing off the bike. To remove the caliper from the bike frame (which you don't have to do since it will be fully open), just unbolt it from the bike frame. You'll probably only need an adjustable wrench. There is usually only one bolt holding it on. If you decide to remove the rear brake caliper, you may want to keep the brake lever on the handlebars if it offers an extra hand position (many brake levers for road bikes are "molded" to give you an extra hand position). |
||
|
||
If you want to remove the brake lever after you've removed everything else, it might be a bigger job than you think. You might have a "combination shifter" where the brake lever and shift lever are one unit. Combination shifters usually offer an extra hand position on the handlebars, so you might want to leave them in place. Otherwise, you'll have to wait until it's time to remove the rear derailleur before you can remove the brake lever for the rear brake (the rear derailleur is the device that "shifts the rear gears"). No matter what kind of brake lever you have, there's a good chance you'll have to remove handlebar tape or grips to get to the brake lever. And the lever is not always easy to unscrew. Sometimes you have to squeeze the lever and shine a flashlight in the crack that opens up when you squeeze it to see what kind of screw holds it on (hex, Phillips head, etc). Of course, sometimes it is as easy as unscrewing a clamp bolt underneath the lever. |
||
A3.3.4 - Removing the rear wheel: There are two main types of rear wheel mounting systems. One type just uses bolts that hold the wheel to the bike frame, and you can remove the wheel with an adjustable wrench. The other type is called "quick-release," and it doesn't require any tools to remove the rear wheel. One side of a quick release wheel has a kind of "toggle." To remove the wheel, you flip the toggle (it can be pretty stiff) and then spin it around to unscrew it; that loosens the wheel. Sometimes, people don't tighten quick release wheels properly, and leave the toggle in the "loose" position. They just spin it around until it seems tight (which isn't good). If your quick-release wheel has been improperly tightened, then when you try to "flip the toggle" to loosen the wheel, you'll end up tightening the quick-release mechanism. Sometimes, the toggles are labeled "open" and "closed" to make it easier, so take a close look at the wheel. |
||
|
||
A3.3.5 - Removing the derailleurs and shift levers: The derailleurs are the devices that shift the front and rear gears of a bike when you move the shift levers. They are located down by the front and rear gears. For most fixie and regular single-speed conversions, you only have to remove the rear derailleur. The front derailleur isn't hard to remove in most cases, but there are a few cases where it can be a lot more work to remove the front derailleur. If you have an "E-type" front derailleur, you will have to pull the cranks and remove the bottom bracket to get the front derailleur off, and then you'll need a spacer or a new bottom bracket to ensure your cranks remain even on both sides of the bike. If you have a "combination shifter" where the front brake lever and front shift lever are part of a single unit, you will have to open up the lever to remove the shift cable, or cut the shift cable as short as you can and pull the cable housing off. Most combination shifters add an extra hand position to the handlebars, so it is not always a good idea to remove them. Before you remove the rear derailleur, it is best to remove the chain first, but you can leave the rear derailleur and chain dangling from the bike for now if you don't know how to remove the chain (section A3.6.3 describes how to remove the chain). To remove the rear derailleur, loosen the cable tension bolt (see illustration below) on the rear derailleur and separate the cable from the bolt. The cable can be attached to the bolt in various ways, and usually is wrapped around something, threaded through something, etc. The tension bolt usually requires a hex wrench, but it may require a screwdriver or other tool. Next, locate the mounting bolt for the rear derailleur (see illustration below). It is usually a single bolt that passes through a hole in the bike frame, but it can also be attached with a small clamp that squeezes onto the bike frame (it is not the same bolt that held the cable). Remove the mounting bolt and the derailleur will come right off. Typically, you will only need an adjustable wrench, hex wrench, or screwdriver. To remove the shift lever for the rear derailleur, you can just loosen the clamp that holds it onto the handlebars. You may have to remove some handlebar tape or grips, but there is usually only one clamp bolt you need to loosen. If your rear shift lever is a "combination shifter" that is part of the same unit as the rear brake lever, you will have to open up the lever and remove the shift cable, or cut the shift cable as short as you can and pull the cable housing off. If you've already removed the rear brake and have a combination shifter, you can remove the combination shifter by loosening the clamp and pulling it off. Sometimes you have to squeeze the lever and shine a flashlight in the crack that opens up when you squeeze it to see what kind of screw holds it on (hex, Phillips head, etc). You might want to leave combination shifters installed if they add an extra position to your handlebars. In most cases, removing the front derailleur is pretty simple. First, loosen the cable tension bolt (see illustration below) and separate the cable from the bolt. The cable can be attached to the bolt in various ways, and usually is wrapped around something, threaded through something, etc. The tension bolt usually requires a hex wrench, but it may require a screwdriver or other tool. Next, locate the mounting bolt on the clamp that attaches to the bike frame (see illustration below). Remove the mounting bolt and the derailleur will come right off. The front shift lever removes just like the rear shift lever (see the paragraph above). If you have an "E-type" front derailleur (pictured below), see section 5.8. Don't cut or remove the cable if you want to leave the front derailleur on! |
||
|
||
|
||
A3.4 - Fixie Conversion A3.4.1 - Cranks: The cranks are the part of the bike the pedals attach to. Together, the right and left "crank arms" make up a "crankset." The right crank arm includes the chainrings (or "front gears"). If you are using your existing cranks, your biggest concern will be the size of the chainring (section A3.6.1 has more information about choosing chainrings). If you are having problems with chainline (the chain keeps coming off), you may have to change the position of the outer chainring (see section A3.6.2 below), but that's probably about all you'll have to do. Section 5.2 contains information about experimenting with crank arm length and "width" (the "width" of a crankset is basically the "width between the pedals," also called "q-factor"). Experimenting with crank arm length is usually easier than experimenting with q-factor, but buying a new crankset for a fixie has made experimenting with crank arm length a little more difficult. Unfortunately, many new cranks sold for "fixies" have a very short crank arm length. If you're tall or have long legs, you might run into a few snags if you want a new "fixie crankset." Rumors are swirling about long crank arms hitting the ground while cornering. This is a unique concern for fixie riders because the pedals keep moving during cornering. The rumors are ridiculous because the difference between a "long" and "short" crank arm is often less than a centimeter. Besides, bike frames for taller riders usually have more than enough "ground clearance" to allow a rider using long crank arms to pedal through the turns. Yet, "fixie crank" manufacturers advertise short crank arms like they are a requirement for fixie riding, and many manufacturers do not even offer longer crank arms (FSA, Sugino, and some other manufacturers offer long crank arms for fixies...). |
||
|
||
The difference between a "fixie crankset" and a regular crankset is that a fixie crankset usually has only one chainring (only one front gear). Fixie cranksets also typically fit "square-taper" bottom brackets (section 5.6 has more information about bottom brackets). Square taper bottom brackets are often found on older bikes, but a new "fixie crankset" typically requires a new shorter-spindle square-taper bottom bracket in order to achieve a perfect fit, such as the Shimano BB-UN54 (size MM107 or MM110) or the Sugino BB-105 or CBB-103 bottom brackets. A3.4.2 - 1/8 or 3/32 track cog? Before you install your new track or flip-flop wheel, you are going to need at least one "cog." The cog is the "rear gear" that fits onto the rear wheel. A "track cog" is used for fixies (along with a lockring). A "freewheel" is used for regular single-speed riding (where the pedals don't go around when you coast). The term "freewheel" does not describe the "wheel" of a bicycle - that's just what the rear "pawl system" is called. A single-speed freewheel comes with one cog. Section A3.6.1 has more information about choosing a track cog and freewheel, and section A3.7 has tips for bikes with vertical dropouts. You need to get a cog with the right "chain width." Most road and mountain bikes, along with some BMX bikes, have a 3/32" (inch) chain. That means the chain is only wide enough for a 3/32" track cog. However, many track cogs are wider than 3/32" - they are 1/8". Some track bikes, along with many BMX bikes, have a 1/8" chain. A 3/32" chain won't fit onto an 1/8" track cog, but a 1/8" chain will fit on to a 3/32" track cog. In other words, if you're unsure what to buy, a 3/32" track cog will fit any bike (but you should try to match the sizes). A 3/32" chain may also be more flexible, and more forgiving in terms of chainline. A3.4.3 - Installing a track cog onto a track or flip-flop wheel: You will need a chain whip (like the Park SR-1) and a lockring tool (like the Park HCW-5) to install the track cog onto your track wheel. To install the track cog onto your track or flip-flop wheel, place the cog onto the wheel and tighten normally with your hand. Then wrap the chain whip around the cog so that the piece of chain "dangling" from the chain whip is on the left (see image below). Turn the chain whip like a wrench to tighten the cog, then put the chain whip aside. If you have a washer that came with your track cog or lockring, slide it on top of the track cog. Next, place the lockring on top of the track cog and tighten the lockring by turning it backwards (counter-clockwise to tighten). Use the lockring tool to tighten the lockring securely (see image below). |
||
|
||
|
||
A3.4.4 - Installing a new track or flip-flop wheel: Before you install your new track or flip-flop wheel onto the bike, you should have already installed the track cog, and opened or removed the rear brake calipers. If you want to install a "freewheel" for regular single-speed riding on the reverse side of a flip-flop wheel, see section A3.5.2. Track and flip-flop wheels just tighten into the dropouts using two nuts (there are no "quick-release" track wheels yet). If you haven't removed your old chain yet, you can just slide the wheel into the dropouts for now and tighten the bolts with your fingers. (Section A3.6.3 has more information about installing the chain, as well as information about removing your old chain.) Even if you have your new chain ready to go, installing the wheel loosely is a good way to check the axle spacing. If the bike frame is too wide for the axle spacing on the track wheel, you can use some washers to fill the gap (it's probably best not to bend the bike frame when you tighten the axle nuts). The washers fit onto the axle of the wheel, just to the inside of the bike frame (see image below). Put an equal number of washers on both sides of the axle, so that the wheel is centered. You can use as many washers as you need, but make sure the last washers you put on each side of the axle are lock washers. A lock washer should be next to the bike frame on both sides of the bike. You can get washers and lock washers at a hardware store, or you can get some "axle spacers" from a bike shop (most bike shops probably won't have lock washers, though.) The only problem with installing the washers as described above is that when you "flip-flop" your wheel for regular single-speed riding, the washers could fall off (a minor inconvenience). If you want to install the washers permanently, you'll need to partially disassemble the rear axle (it requires a "cone wrench"). It is probably best to have a bike shop help you install permanent "axle spacers." Once you've got the spacing figured out, you can only install the wheel the rest of the way if you've already removed your old chain and have your new chain ready to go (if not, see section A3.6.3). To finish installing the wheel, put the axle into the dropouts and slide the wheel along the dropouts toward the front of the bike. If you have vertical dropouts, you will have remove the wheel from the dropouts and slide the wheel forward, so that the bike frame rests on the axle. Then pull the chain around the front chainring and rear cog. The chain should now be loosely wrapped around both the rear cog and front chainring. Slide the rear wheel back into the dropouts, pulling with moderate force to tighten the chain. Make sure the wheel isn't pointed to the right or left, and tighten the nuts. You will probably have to keep one hand on the wheel as you get the bolts started to make sure the chain stays tight, and to make sure that the wheel doesn't point to the right or left. As long as the chain is on good and tight and everything fits, you can tighten the axle bolts firmly. Failure to secure the axle bolts can cause the rear wheel to turn to the right or left and hit the bike frame, which will lock up the rear wheel. |
||
|
||
|
||
A3.4.5 - Brakes Your fixie should have brakes. There are a lot of rumors about track bikes designed for a velodrome that don't have brakes, but these bikes never leave the velodrome. DO NOT remove the front brake from your fixie! A front brake is good, but a front brake paired with a quick-release rear brake is better. A good set of brakes allows you to make sudden stops in heavy traffic. Besides, many brake levers for road bikes become part of the handlebars, adding an extra hand position similar to a "bull bar" (section A3.4.7 has more information about bull bars and fixies). Brakes are also helpful if you want to use clipless (bolt-on) pedals on your fixie, so that you can pull up on the pedals with your feet (section A3.4.6 below has more information about riding a fixie with clipless pedals). A3.4.6 - Pedals: Fixie riders use all kinds of pedals, but toe clips are very popular. If you prefer clipless (bolt-on) pedals to toe clips, you can still use them, but having brakes make them easier to use. "Mountain bike" shoes and compatible pedals will probably work best for this. I also recommend spraying a little WD-40 on the clipless pedal mechanism to make sure it is easy to remove your foot (you can increase the tension adjustment if your foot slips out while riding). A number of manufacturers, including Forté, Nashbar, and Shimano, make pedals that offer a clipless (bolt-on) mechanism on one side of the pedal, while the other side is designed like a regular pedal for regular shoes. You can even put toe clips on the regular side. Forté calls theirs the "Campus Pedal," and Nashbar calls theirs the "Rodeo Pedal." A3.4.7 - Handlebars: The handlebars you have should work fine on your fixie as long as they are the right size. However, there are certain hand positions many fixie riders prefer. Since so many fixies start out as road bikes, some people like to customize the traditional "drop bars" that often come with road bikes. The handlebar is installed upside down, and the "drops" are cut off so that it resembles a "bullhorn bar" or "time-trial bar." Newly purchased bullhorn and time-trial bars are also extremely popular. If your fixie is a mountain bike, you might consider getting some "bar ends" to achieve a similar hand position. If you have brake levers or combination shift levers designed to offer an extra hand position, you already have something like a "bull bar" position. Traditional drop bars work great, too, especially if your fixie is a road bike. |
||
|
||
A3.5 - Single Speed Conversion A3.5.1 - Easy single speed conversion: The easiest way to convert your bike to a regular single-speed is to stop changing gears. If your shifters are broken or not working right, you can remove the front derailleur and place the chain onto whichever front chainring you want to use. If you remove the front derailleur, you'll probably be able to remove the front shift lever along with it, but if you have a combination shifter that is part of the same unit as the front brake lever, just remove the derailleur and leave the shift lever alone (you can just cut the shift cable up close to the lever). If the rear gears are your problem, you can try tightening the cables and adjusting the H and L screws to get into the gear you want, then just don't change out of that gear. If you want to remove both the front and rear derailleurs, you will have to resize the chain (see section A3.6.3). Horizontal dropouts will also make things easier if you go that route. But you can still use your existing front chainrings and rear gears (the cluster of "rear gears" on the rear wheel is called a "freewheel" or a "cassette," depending on how it attaches to the wheel). But say, for the sake of neatness, you want to have only one chainring by the pedals and one cog on the rear wheel - a true single speed. You can usually remove the extra chainrings from the front of the bike with a little extra work (it usually requires a special tool - see section A3.6.2), but getting the gears on the rear wheel reduced down to one "cog" is pretty hard. You have to figure out whether your rear gears are in the form of a "freewheel" or a "cassette," and then you have to buy the right removal tool or tools (sometimes you need more than one tool). It is almost impossible to tell the difference between a freewheel and a cassette just by looking, and some cassettes are pretty rare. Your local bike shop should be able to help you if you want to replace your freewheel or cassette with a single-speed version. An easier approach to replacing your freewheel or cassette is to just get a new flip-flop track wheel. A flip-flop wheel is reversible, so you can use it as both a regular single-speed wheel as well as a track wheel for fixed-gear riding. A3.5.2 - Installing a new flip-flop wheel: Installing a flip-flop track wheel for regular single-speed riding is the same as installing one for fixed-gear riding (see section A3.4.4), except you flip the wheel around and put it on the other way. You will need to buy a "single-speed freewheel" for this side of the wheel (instead of a "track cog and lockring" like the fixie side uses). A "freewheel" is used for regular single-speed riding (where the pedals don't go around when you coast). The term "freewheel" does not describe the "wheel" of a bicycle - that's just what the rear "pawl system" is called. A single-speed freewheel comes with one cog. The freewheel screws on just like a track cog, and tightens with a chain whip (like the Park SR-1). However, you will need a special "removal tool" to get it back off, so make sure you put it the correct side of your flip-flop wheel (see image below). Section A3.6.1 has more information about choosing a freewheel, but if you have vertical dropouts, see section A3.7. |
||
|
||
|
||
|
||
A3.6.3 - Chain length: The easiest way to get the correct chain length is to install everything onto the bike but the chain, then adjust the length of the chain. So you should install the rear wheel (with the cog or freewheel on it) into the dropouts, and make sure the front chainring is in place. If you have horizontal dropouts, position the wheel about half way between the front and back of the dropout. If you're using a small rear cog (12-14 teeth) you can move the wheel farther toward the front of the dropouts, and if you're using a large rear cog (21 or more teeth) you can move the wheel farther toward the back of the dropouts. Be sure your chain is the right width for your chainring and cog (3/32 or 1/8) before you get started (section 3.6.1 has more information about chainring and cog sizes). It is probably a good time to replace your old chain since you will be removing it from the bike. You'll be using a chain tool to "open" your old chain and remove it from the bike (see image below). In addition to opening a chain, the chain tool is also used adjust the length of a chain. New chains are already "open," and have plenty of extra length. If you haven't used a chain tool before, you can practice on your old chain. This tutorial is also helpful. Try to buy more than one new chain because the chain tool is hard to use. To open the chain, take the chain tool and put the link of the chain you want to open over the front two notches of the chain tool (see image below). These are the notches farthest from the lever. Tighten the screw with the lever so that the tip of the screw lines up with the pin in the chain. Then SLOWLY tighten the screw to push the pin through the chain, but DON'T push the pin all the way out. You have to leave the pin inserted into the last "outer plate" of the chain. It's less than a millimeter thick, so it's best to go slowly and make multiple attempts. Before you get to the outer plate, unscrew the chain tool and see if the chain comes apart. If not, retighten the screw and try again. If you push the pin all the way through the outer plate, you won't be able to close (or re-link) the chain very easily (it takes skills). If you mess up and push the pin all the way out, you can use this same procedure to shorten the chain and take another shot at getting the pin to stay in the last plate. You'll probably be shortening the chain anyway. To determine how long the chain needs to be, wrap the open chain around the front chainring and rear cog, and pull the chain tight. You might have to lift the chain over some of the teeth before you can get all the slack out. Bring the chain together with your fingers, and mark the link that looks like it will meet. Keep in mind that the chain actually has two kinds of links: a wide one and narrow one. The links are arranged "wide-narrow-wide-narrow," etc. Since a wide link can only be joined to a narrow link, you can only shorten or lengthen the chain by two links. You want to get it as tight as you can, but try to avoid guesswork. If you're trying to decide between two close lengths, go with the longer one, because you can always shorten it more. Shortening it isn't exactly easy, but lengthening it can be extremely difficult depending on how much extra chain you have to add. Once you know the length you need, you can use the same procedure you used for opening the chain in order to shorten it (described above). If you messed up with the chain tool and pushed a pin all the way through the chain, you can fix your chain by shortening it. To close (or re-link) the chain, put it in the chain tool so that the pin sticking out of the outer plate faces the screw of the chain tool. You should still be using the front notches of the chain tool, farthest from the lever. Tighten the screw of the chain tool to push the pin back into the chain. The pin should be even on both sides of the chain. Anytime you re-link a chain with a chain tool, you have to account for the way the chain tool can bend the chain. After you remove the chain from the chain tool, the link is usually a little stiff. This is because the force of the chain tool bends the chain very slightly. To straighten the link, turn the chain around the other way (or turn it upside down) and place the link over the back notches of the chain tool (these are the notches closest to the lever and screw - see image below). Tighten the screw against the pin slightly, but don't tighten the screw so hard it starts to move the pin; you don't want the pin moving again. You're just trying to bend the chain a little. Then remove the chain from the chain tool and make sure the link moves freely. If it doesn't, try to straighten it again or turn it upside down and straighten the other side. When you're done, you can put the chain back on the bike and close it (re-link it) with the chain tool. Of course, you don't want the chain pulled tightly onto the chainring and cog when you put it on the bike, otherwise you won't be able to use the chain tool. Just put the front of the chain between the chainring and bike frame, around the bottom bracket shell. That should leave you plenty of slack to close the chain. Now that you know all about chains and chain tools, I'll mention "power-links." These are special links found on newer chains (usually somewhere in the bag or box if you buy a new one). A power-link allows you to open and close the chain without the chain tool, but you have to install the power-link onto the chain. So, you have to take the power-link into account before you adjust the length of the chain, or else you will have to remove a "wide link" to make room for the power-link (assuming you want to use it). Section A3.6.4 below describes how to install the chain the rest of the way onto the bike. |
||
|
||
A3.6.4 - Installing the chain: This is the big test of the chain length, especially if you have vertical dropouts. You should have already adjusted the chain to the right length and partially installed onto the bike (see section A3.6.3 above for information about adjusting the chain length and getting the chain in place). The rear wheel should have the cog installed, and already be sitting in the dropouts. And the chainring should be installed onto the right crank arm (if it was removed). You should have placed the chain on the bike frame so that it is wrapped around the rear cog (or freewheel), but sitting between the front chainring and the bike frame. The chain should be closed. And of course, the chain should be the right "width" (3/32 or 1/8). If you tightened the nuts on the rear wheel, loosen them slightly, and slide the wheel along the dropouts toward the front of the bike. If you have vertical dropouts, you will have remove the wheel from the dropouts and slide the wheel forward, so that the bike frame rests of the axle. Then pull the chain around the front chainring. The chain should now be loosely wrapped around both the rear cog and front chainring. Slide the rear wheel back into the dropouts, pulling with moderate force to tighten the chain. Make sure the wheel isn't pointed to the right or left, and tighten the nuts. You will probably have to keep one hand on the wheel as you get the bolts started to make sure the chain stays tight, and that the wheel doesn't point to the right or left. Section A3.4.4 has more information about installing the rear wheel. If the chain is too loose, you'll have to take the wheel off and shorten it again (see section A3.6.3). If you have vertical dropouts and are having problems getting the chain tight, section A3.7 has some tips. Once you get the chain tight, make sure the axle bolts are good and tight. You don't want the wheel turning to the right or left, because it can rub against the bike frame and lock up. Make sure the lockring has been installed over the track cog! |
||
|
||
A3.7 - Tips for dealing with vertical dropouts Make sure you understand how to: size a chain; install a chain; install a chainring; and install a track cog. You'll be doing over and over! You may also need to know how to remove unused chainrings, which involves pulling the right crank. So, some tools you'll need for this job are a chain tool, a chainwhip (like the Park SR-1), a lockring tool (like the Park HCW-5), and possibly a crank puller and ratchet. You'll probably also need an adjustable wrench, hex wrench, and screwdriver. If you are installing a flip-flop wheel and want to size the fixie side as well as the regular single-speed side, do the fixie side first, then get a freewheel the same size as the track cog you used. You can also use your old wheel to help determine the freewheel size (described below). The basic idea is to put on a chainring and a track cog, size the chain, and try to get the wheel into the vertical dropout. If you've sized the chain as close as you can get it and it is still too tight or too loose, you start over with a different size chainring. You can also start over with a different size track cog, or start over with different sizes of both. Then you resize the chain again, and try to get the wheel into the vertical dropout so that the chain is tight, but not too tight. So, you're going to need several different sizes of chainrings and cogs! (Make sure they are all the same width- 3/32 or 1/8 - and that they match the width of your chain. A 3/32 chain may be more flexible, and be more forgiving in terms of chainline.) Don't put the lockring on until you get everything to fit, or you'll just have to take it back off. I would get at least 4 chainrings that are one tooth apart, or as close as you can get to one tooth apart (e.g. 44T, 45T, 46T, 48T). Then get about 5 track cogs that are as close as you can get to one tooth apart (14T, 16T, 17T, 18T, 19T). You could also put your old wheel back on with the different sizes of rear cogs and experiment that way, then count the number of teeth on the gear that worked and buy the same size track cog. But you'll still need several chainrings, because the two or three chainrings on the front of your bike are quite different in size. Make sure you buy the right width chainrings and cogs for your chain (3/32 or 1/8), then get at least two new chains. You should also get a "half-link" that fits your chain. A half-link will shorten or lengthen the chain "half" the length that removing or adding a regular link will (comes in handy). Since you'll probably be trying a number of different chainrings, make it easy on yourself and don't put the chainring on the inside of the bolt circle spider. If your chainline is so bad you have to do it that way, just put the chainring on the outside of the bolt circle spider to find the size chainring you need, and then put it inside when you're done. Try some different combinations of chainrings and cogs and try to narrow it down. Whether you replace a chainring or a cog, they both make about the same size change in the length of chain you'll need. So why not just try different track cogs and use only one chainring? Having several chainrings and cogs allows you to retain some amount of choice in how difficult it will be to pedal your fixie. When you add a tooth to a chainring, it make is harder to pedal, but when you add a tooth to a rear cog, it makes it easier to pedal. It should all work out. If it doesn't, don't forget to try a "half-link." Once you've got everything like you want it, you can return any unused cogs, chainrings, chains, or half-links you didn't use, or re-sell them on the Internet. Don't forget to put the lockring on once everything fits! A3.8 - Chainline Chainline is more important for fixies and regular single-speeds than it is for bikes with multiple gears. In fact, some people think chainline is the most important thing on a fixie or single-speed. Other people take a simpler approach to chainline: if the chain doesn't come off, don't mess with the chainline. A noisy chain can often be quieted using chain oil, or in extreme cases, bike lube (like Park PPL-1). Of course, a bad chainline can cause cogs, chainrings, and chains to wear out quickly. In most cases involving fixies and single-speeds, a bad chainline is usually caused by the front chainring sitting too far away from the bike frame. There are lots of ways to fix it. You can replace the cranks, bottom bracket, or both. Or you can have new spokes put on the rear wheel to move the hub over. You can also replace everything effecting the chainline: cranks, bottom bracket, and spokes. But the easiest way to fix a bad chainline is to move the chainring to the "inside" of the bolt circle spider, where the smaller chainrings are (see image below). Section A3.6.2 describes how to do this. |
||
|
Appendix 4: External Bearing and Press Fit Bottom Brackets |
||
| There are a few newer cranks that use a totally different design from other cranks, and most of them have bolts on only one side of the bike (though in some cases it may just be a "pinch bolt"). The newest design is a type of "press-fit" system (tools and instructions: 1 | 2). The crank arms come in different lengths, but it is not clear what is available in terms of width (q-factor) because these designs are still new. The cranks fit on bikes with bottom bracket shells specifically designed for "press-fit" cranks, and cannot yet be converted to a cartridge or other bottom bracket system. Most of these cranks are "two-piece" (5), which means that the bottom bracket and crankset must be sized and replaced together. | ||
|
||
At the present time, you are most likely to encounter an "external bearing" crankset if you see a bolt on only one side of the bike (though in some cases it may just be a "pinch bolt"). External bearing cranks and bottom brackets are often "two-piece" (5), which means they have to be sized and replaced together (tools and instructions: 1 | 2). Most designs are offered with different crank arm lengths, but experimentation with "width" (q-factor) is limited to pedal design along with what various crankset manufacturers offer, although different crankset widths may not be available. You may have to convert to a cartridge system (which should be possible) to experiment with "width," especially narrower widths. That may require two sets of tools - one set to remove; one set to install. (Obviously, you can't use external bearing cranks with a cartridge bottom bracket - so you'll have to purchase cranks to go with the cartridge!) Or you may be able switch to a type of "self-tightening" bottom bracket used in special cases (more info). |
||
|
||
|
||
|
||
While on most bikes you more likely to encounter an external bearing crankset if you see a bolt on only one crank arm, on BMX bikes you are more likely to encounter a two-piece "press-fit" crank if you see a bolt on only one side. The two-piece cranks used on BMX bikes are similar to the newer "press-fit" designs other types of bikes are starting to use. Of course, you might not see any bolts at all on some BMX cranks. Some BMX bikes use a "one-piece" Ashtabula crank, which has no bolts on either crank arm. However, many BMX bikes have a type of press-fit design with bolts on both sides of the bike. BMX bikes sometimes have cranks with bolts on both sides of the bike that use a type of 3-piece press-fit bottom bracket spindle and bearing system (5) (see photo). The bottom bracket is typically sold with the crank arms. Some of these cranks may have 10 splines, just like ISIS cranksets. But it isn't clear whether or not they are ISIS compatible. The crank arms come in different lengths, but it is hard to tell whether the spindles for these 3-piece press-fit cranks come in different lengths (they probably don't). Varying the length of the spindle would change the "q-factor." It does look like there are a lot of different cranksets (and spindles) available, though. In certain cases, it appears to be possible to convert a "one-piece" BMX bottom bracket and crankset to a "3-piece" BMX bottom bracket and crankset. There are also some older BMX bikes with a threaded bottom bracket shell. They are likely to be similar to other types of threaded bottom bracket systems (not including "external bearing" systems). However, all of the parts may not be interchangeable with other threaded bottom bracket systems. |
||
|
||
|
||
|
||
The cycling industry has adopted a number of new standards for cranksets, including the "external bearing" and "press-fit" cranksets pictured above. Since these crankset designs are new, information about them is more difficult to come by. The links above offer a great deal of information, and more information may be made available about these cranksets in the future. |
||
Gift Shop |
||
|
||||||||||||||||||||||||||||||||||||||||||||||
| Notes |
| 1) I'm not
talking about the "handlebar clamp diameter." I realize it is
confusing since so many numbers look the same. This is the part of the quill
stem that fits down into the fork. 2) I'm not talking about the "handlebar clamp diameter." I realize it is confusing since so many numbers look the same. This is the part of the threadless stem that fits over the "steerer." 3) Wow! So, your threadless adapter needs to have the same diameter on one end as the part of your quill stem that fits into the fork. The other end of the threadless adapter needs to match the threadless stem that you're buying. And don't forget, your new threadless stem also has to fit your handlebars! To add to the confusion, all of the numbers look the same and manufacturers list them in different ways. Basically, there are three "diameters" you have to keep up with! (See diagram.) 4) In most cases, you won't find an ISO taper on a bike with an ISO thread in the bottom bracket shell (an ISO thread is also called a "British" or "English" thread, but an ISO taper is not British/English). Usually, bikes with a square taper bottom bracket have a JIS taper and British/English/ISO threads in the bottom bracket shell (most people just say "British threads" to avoid confusion - it doesn't matter whether or not the bike is British). Italian bikes usually have an ISO taper with an "Italian" thread in the bottom bracket shell. Since the two taper standards (ISO and JIS) can be interchanged (mixing them up changes the "q-factor"), it probably isn't worth worrying about. But if you're buying a cartridge and want to perfect your "q-factor," this information may be of interest, especially if you have an Italian bike and a non-Italian crankset or an Italian crankset and a non-Italian bike. There is also a chance you have a used bike and someone has made changes to the bottom bracket or the cranks, making it difficult to figure out what's going on. Anyway, an Italian bike with a non-Italian crankset should have a JIS taper, an Italian thread, and usually has a 70mm shell length. The Shimano UN54 bottom bracket has a JIS taper and is available in a 70mm shell length with an Italian thread, but if you also need an offset (as in an offset chainline, not an E-type or chain guide), you will probably need to get a Phil Wood cartridge or adapt the UN54. A non-Italian bike with an Italian crankset (probably a Campagnolo crankset) should have an ISO taper, a British/English/ISO thread, and usually has a 68mm shell length. The Campagnolo Veloce and other SC-S bottom brackets have ISO tapers and are available in a 68mm shell length with a British/English/ISO thread, but if you also need an offset (as in an offset chainline, not E-type or chain guide), you will probably need to get a Phil Wood cartridge or adapt a Campagnolo cartridge. 5) Some people may refer to adjustable cup bottom brackets as "3-piece," and refer to cartridge type bottom brackets as something else. Other people may refer to a number of different cartridge type bottom brackets as "3-piece" or "2-piece." But a bottom bracket system referred to as "2-piece" can also mean the spindle is permanently attached to one of the crank arms. Technically, all adjustable cup and cartridge type bottom brackets are "3-piece." There are also "3-piece" BMX bottom bracket systems different from the traditional adjustable cup or cartridge systems. Sometimes, "2-piece" bottom bracket systems that have the spindle permanently attached to one of the crank arms are incorrectly referred to as "one-piece," but a "one-piece" bottom bracket usually refers to an Ashtabula bottom bracket system. 6) If you're lucky, there will be a code stamped on one of the ends of the spindle that sticks through a crank arm. Then you won't have to remove the bottom bracket to see the code, and you can buy your new bottom bracket at the same time you buy the tools. |
Selected Works Cited |
| Jones, C. Calvin. (2008). Big blue book of bicycle repair. Second edition. Saint Paul, MN: Park Tool Co. |
Selected Works Cited from Internet |
| Miscellaneous
Internet Articles: - "3-piece: BikePartsUSA." http://www.bikepartsusa.com/bikeparts/category/bottom_brackets-3-piece (viewed Dec. 6, 2008). - "Buyers' Guide to 'Fixie' Bicycles." http://bicyclehabitat.com/page.cfm?pageID=606 (viewed Feb. 11, 2009). - "Fixed Gear Bikes an Urban Fixture." http://www.wired.com/culture/lifestyle/news/2005/04/67149 (viewed Feb. 11, 2009). - "FSA to Launch BB30 Threadless Bottom Bracket." http://velonews.com/article/13862 (viewed Nov. 24, 2008). - "How to Change a Chain." http://www.bicyclinglife.com/HowTo/ChangeAChain.htm (viewed Nov. 17, 2008). - "How to Fit a Bicycle." http://www.peterwhitecycles.com/fitting.htm (viewed Nov. 22, 2008). - "Stainless Steel Crank and Bottom Brackets..." http://www.philwood.com/SpecStainlessBB.htm (viewed Dec. 7, 2008). - "Tools." http://www.philwood.com/products/Tools.pdf (viewed Dec. 21, 2008). Park Tools Articles: - "Adjustable Spanner." http://www.parktool.com/products/detail.asp?cat=25&item=SPA-6 (viewed Nov. 17, 2008). - "Adjustable Type Bottom Bracket Service." http://www.parktool.com/repair/readhowto.asp?id=93 (viewed Nov. 17, 2008). - "Avid Hydraulic... Hose Length Changes." http://www.parktool.com/repair/readhowto.asp?id=142 (viewed Nov. 28, 2008). - "BB30 Bearing Installation and Removal." http://www.parktool.com/repair/readhowto.asp?id=162 (viewed Nov. 24, 2008). - "Bearing Tool Set for BB30 and BB90..." http://www.parktool.com/products/detail.asp?cat=25&item=BBT-39 (viewed Nov. 24, 2008). - "Bottom Bracket Tools." http://www.parktool.com/products/category.asp?cat=25 (viewed Nov. 17, 2008). - "Calvin's Corner: Shimano Dura-Ace 7900." http://www.parktool.com/repair/readcalvinscorner.asp?id=216 (viewed Nov. 24, 2008). - "Calvin's Corner: Thinking About Your Ride." http://www.parktool.com/repair/readcalvinscorner.asp?id=213 (viewed Dec. 6, 2008). - "Cartridge Type Bottom Bracket Service." http://www.parktool.com/repair/readhowto.asp?id=94 (viewed Nov. 17, 2008). - "Crank Installation and Removal - Square Type." http://www.parktool.com/repair/readhowto.asp?id=103 (viewed Nov. 24, 2008). - "Crank Pullers." http://www.parktool.com/products/category.asp?cat=26 (viewed Nov. 17, 2008). - "Crank Removal and Installation: ISIS Drive or Octalink." http://www.parktool.com/repair/readhowto.asp?id=120 (viewed Nov. 17, 2008). - "External Bearing Crank Systems." http://www.parktool.com/repair/readhowto.asp?id=95 (viewed Nov. 17, 2008). - "Front Derailleur Adjustments." http://www.parktool.com/repair/readhowto.asp?id=75 (viewed Nov. 25, 2008). - "Hayes Hydraulic Brake Service." http://www.parktool.com/repair/readhowto.asp?id=138 (viewed Nov. 28, 2008). - "Shimano Hydraulic Brake Service." http://www.parktool.com/repair/readhowto.asp?id=126 (viewed Nov. 28, 2008). Sheldon Brown's Articles: - "1992 Bridgestone Bicycle Catalog." http://www.sheldonbrown.com/bridgestone/1992/1992.pdf (viewed Dec. 22, 2008). - "Bolt Circle Diameter." http://www.sheldonbrown.com/gloss_bo-z.html (viewed Nov. 22, 2008). - "Bottom Bracket Size Database." http://www.sheldonbrown.com/bbsize.html (viewed Nov. 17, 2008). - "Cranks." http://www.sheldonbrown.com/cranks.html (viewed Nov. 25, 2008). - "Fixed Gear." http://www.sheldonbrown.com/fixed.html (viewed Feb. 11, 2009). - "Fixed Gear Conversions." http://www.sheldonbrown.com/fixed-conversion.html (viewed Feb. 11, 2009). - "Hands Up! Adjusting Handlebar Height." http://www.sheldonbrown.com/handsup.html (viewed Nov. 17, 2008). - "Singlespeed Conversions." http://www.sheldonbrown.com/singlespeed.html (viewed Feb. 11, 2009). - "Square Taper Bottom Bracket Interchangeability." http://www.sheldonbrown.com/bbtaper.html (viewed Nov. 17, 2008). - "Tool Tips: Cotterless Cranks." http://www.sheldonbrown.com/tooltips/cotterless.html (viewed Nov. 17, 2008). - "Wheelbuilding." http://www.sheldonbrown.com/wheelbuild.html (viewed Feb 11, 2009). Wikipedia Articles: - "Adjustable Spanner." http://en.wikipedia.org/wiki/Adjustable_spanner (viewed Nov. 22, 2008). - "Bicycle Brake Systems." http://en.wikipedia.org/wiki/Bicycle_brake_systems (viewed Nov. 26, 2008). - "Bottom Bracket." http://en.wikipedia.org/wiki/Bottom_bracket (viewed Nov. 17, 2008). - "Cable Tie." http://en.wikipedia.org/wiki/Cable_tie (viewed Nov. 26, 2008). - "Crankset." http://en.wikipedia.org/wiki/Crankset (viewed Jan. 3, 2009). - "Fixed-gear Bicycle." http://en.wikipedia.org/wiki/Fixed-gear_bicycle (viewed Feb. 10, 2009). - "Hex Key." http://en.wikipedia.org/wiki/Allen_wrench (viewed Nov. 22, 2008). - "Pipe Wrench." http://en.wikipedia.org/wiki/Pipe_wrench (viewed Dec. 6, 2008). - "Q Factor." http://en.wikipedia.org/wiki/Q_Factor_(Bicycles) (viewed Nov. 17, 2008). - "Quick Release." http://en.wikipedia.org/wiki/Quick_release (viewed Feb. 10, 2009). - "Ratchet." http://en.wikipedia.org/wiki/Ratchet_(device) (viewed Feb. 10, 2009). - "Shifter." http://en.wikipedia.org/wiki/Shifter_(bicycle_part) (viewed Nov. 26, 2008). - "Single-speed Bicycle." http://en.wikipedia.org/wiki/Single-speed_bicycle (viewed Feb. 10, 2009). - "Socket Wrench." http://en.wikipedia.org/wiki/Socket_wrench (viewed Nov. 22, 2008). - "Track Bicycle." http://en.wikipedia.org/wiki/Track_bicycle (viewed Feb. 10, 2009). - "Velodrome." http://en.wikipedia.org/wiki/Velodrome (viewed Feb. 10, 2009). - "Wrench." http://en.wikipedia.org/wiki/Wrench (viewed Feb. 11, 2009). |
| ©
2009 by T.J. Newton. All Rights Reserved. A more detailed copyright policy should be forthcoming. It will probably be similar to this one. |
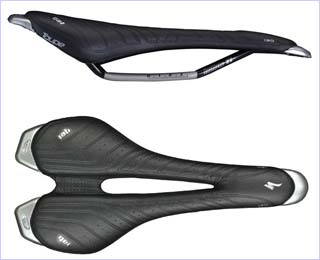
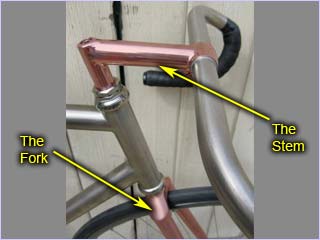
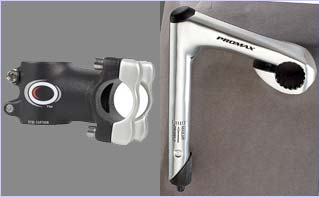
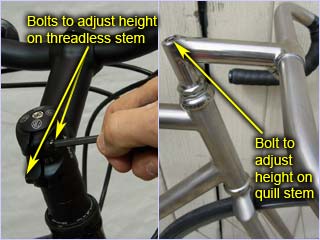
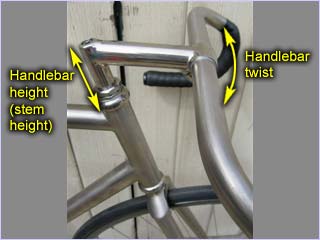
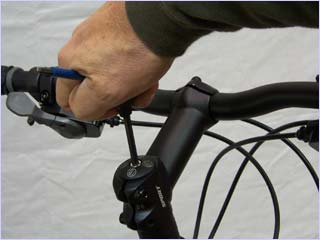
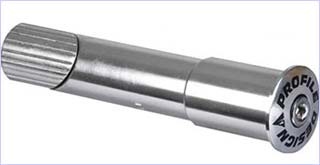
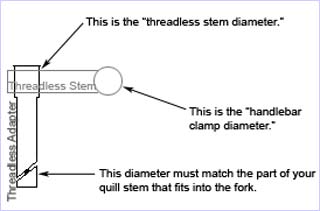
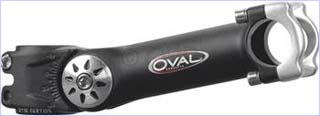

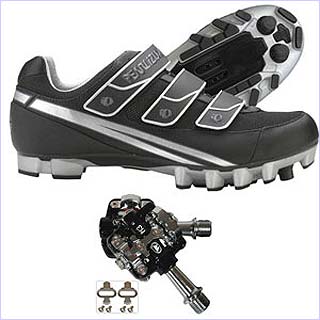
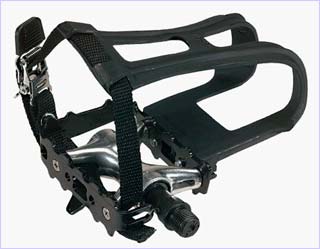
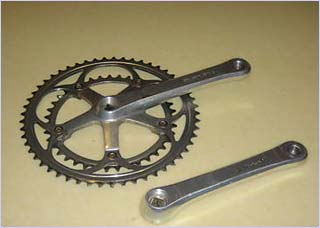
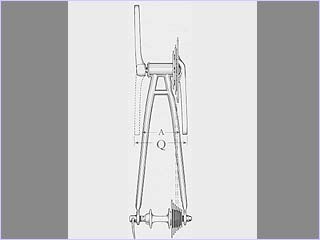
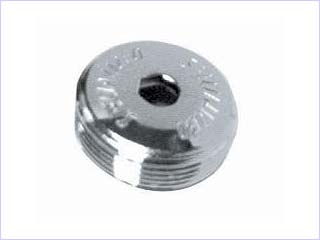
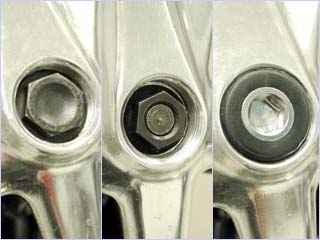
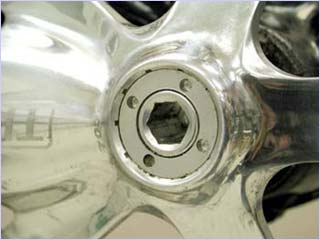
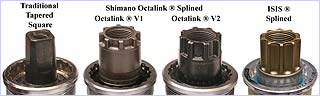
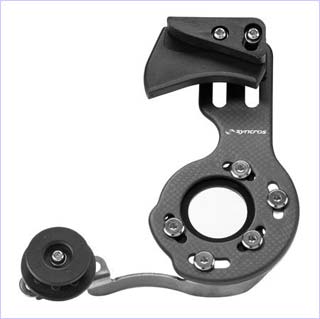
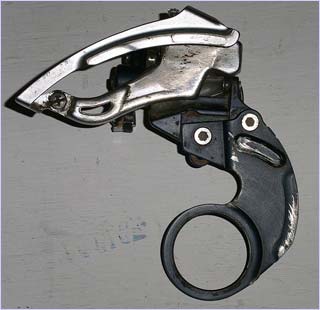

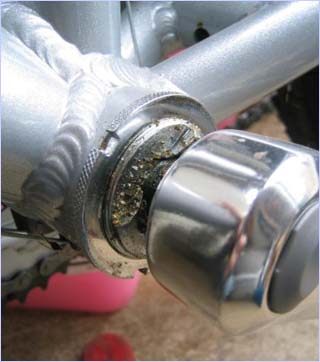
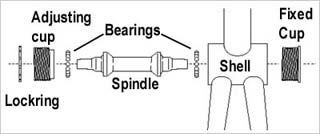
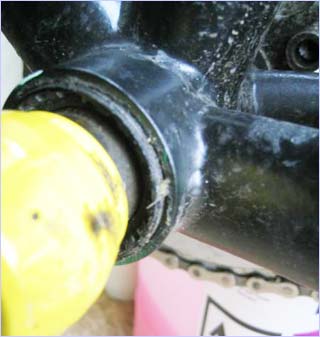
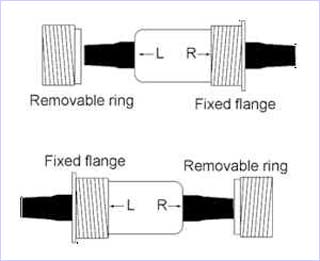
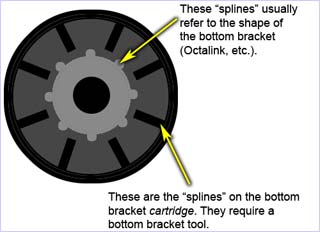
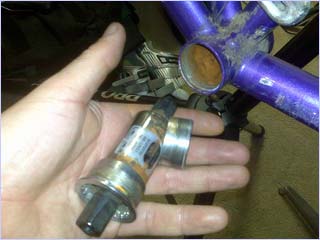
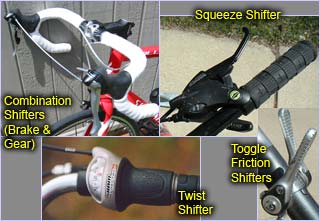
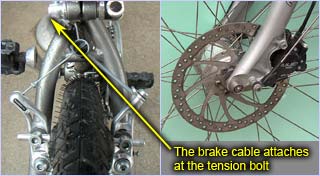
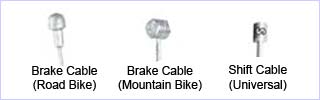
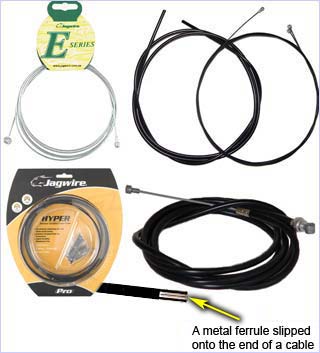
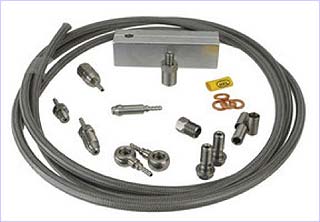
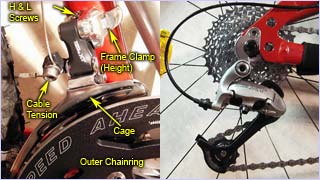
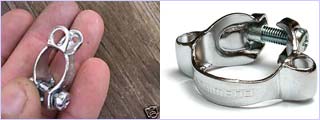
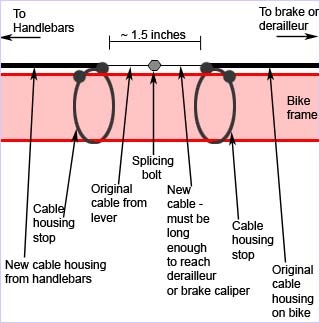
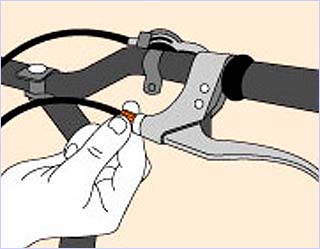
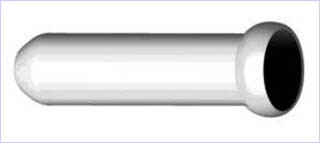
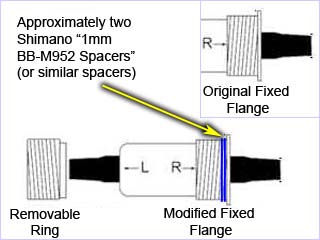
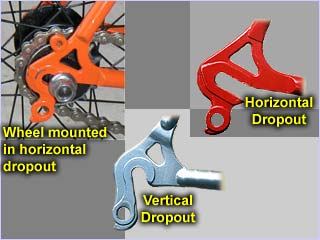
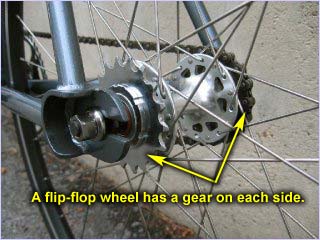
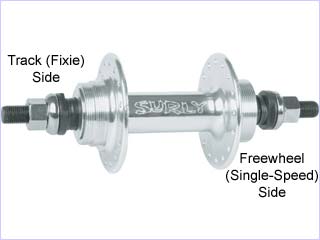
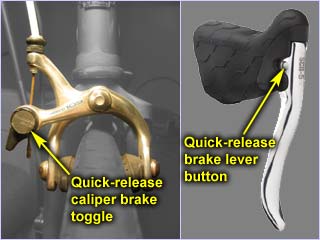
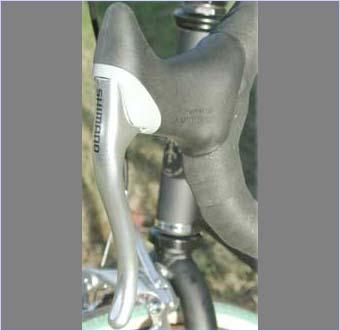
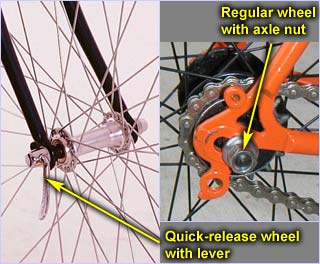
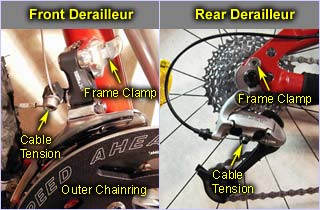
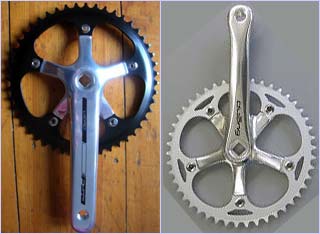
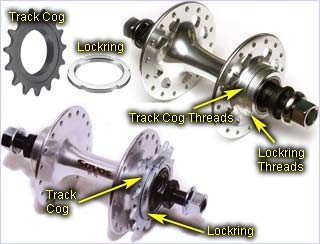
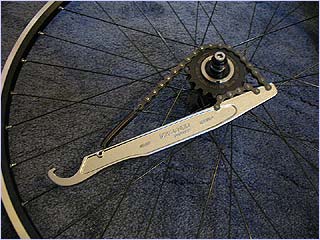
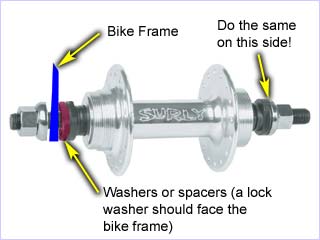
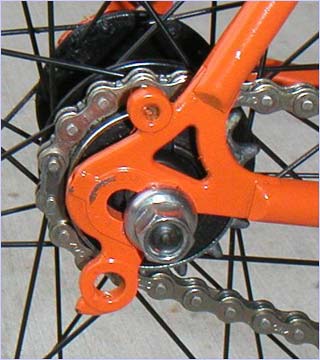
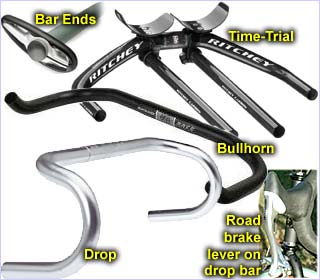
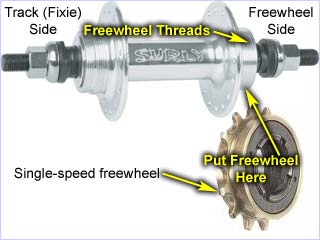
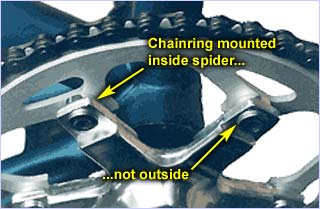
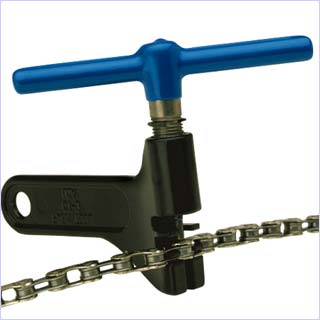
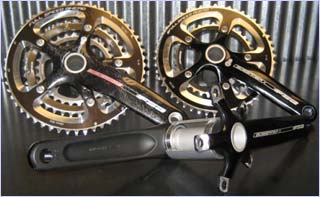
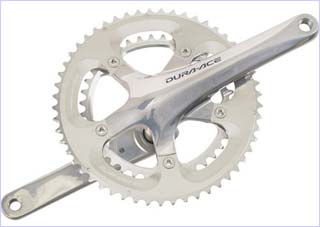
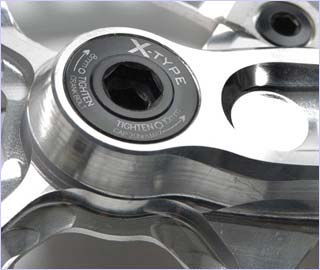
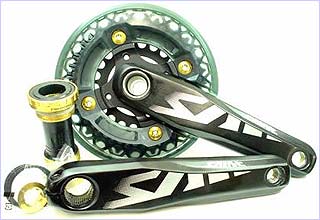
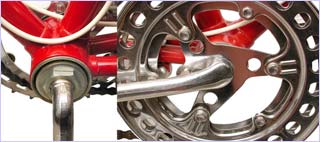
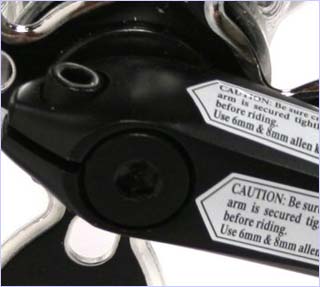
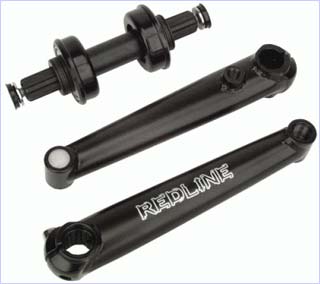
 Shopping
at NewsKing.org is easy. Just click "Add to Cart" to select
an item, and a shopping cart window will open. Major credit cards,
eCheck, and PayPal accepted.
Shopping
at NewsKing.org is easy. Just click "Add to Cart" to select
an item, and a shopping cart window will open. Major credit cards,
eCheck, and PayPal accepted.